Published
- 5 min read
Installing FFMPEG for Windows

Why do I even need this?
FFmpeg is pretty much the media encoder. It’s powerful yet lightweight (the ultimate combo) and natively supports an incredible array of codecs (algorithms for coding and decoding, hence the name, “codec”) and can aid in pretty much any operation or task you might need in regards to media processing.
There are other options, of course, but there are none that compete with what it can do while also being free and open-source.
Pretty much every online conversion tool uses this under-the-hood and is just a wrapper (which just means that it’s a front-end or graphical user interface) for FFmpeg. I personally use it for a variety of tasks for everyday operation, and I’m still learning to use it for other stuff as well. The only con with the software is that it is so large in scope that it requires significant time to learn how to use it properly. As well as this, out-of-the-box it is a CLI (command-line-interface) tool, which can be intimidating to many people. However, I promise that with a little bit of investment you can save yourself a lot of time later.
Where do I get it?
From their website, the download link being here.
Just click on the Windows icon and you can choose either the “Windows builds from gyan.dev” or “Windows builds by BtbN”, doesn’t particularly matter which one you chose. After that, you’ll be presented with a choice between the “essentials” pack and the “fuil” edition. The difference in size is minimal for modern hardware, but if you’re concerned about that, just download the essentials and that should be sufficient for most beginner tasks.
If it’s not, simply download the other option.
Ok, downloaded it…but it’s a .zip. What the heck do I do with that?
You’re gonna wanna extract that. Where you choose to extract it is ultimately up to you, but good practice would be to create a new folder in your main drive under program files, typically labeled as “C:\Program Files”, and name it something like “FFmpeg” or any other name you might want to give it. Once that’s done, extract the contents of the zip (using winrar, 7zip, or any other tool) there.
And there you have it. It’s installed. But, as I mentioned before—it’s not a standard executable like the kind you might be accustomed to. It’s a CLI tool, which means it’s only usable while in a terminal, the default option on a Windows OS being command prompt (but also fine to use it with Powershell, for more advanced users).
Of course, there’s other console options as well, but that’s a little out of scope for this.
The PATH we choose to walk
So, using a CLI tool requires that the system be able to globally recognize that application as, well, an application. Now, the way to do that is to provide its file path every time you want to run the command, or otherwise make a script to access it and run that script every time you want to use the program, but that obviously isn’t a great long-term solution.
Luckily, there’s a a natively supported solution in the Windows OS, known as the System Variables, specifically, the PATH variables. These can be thought of as a neatly organized toolbox your PC can pull from whenever you ask it to run some program from the CLI.
So, all we need to do is add FFmpeg to that toolbox, and we’ll be good to go.
- Hit the Windows key, or open the search bar on your taskbar.
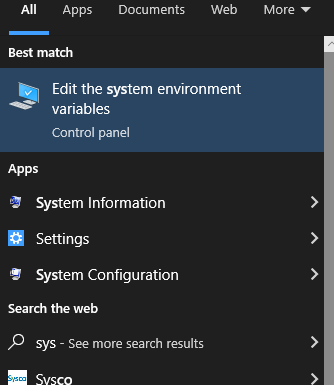
- Type in “System”. This should pull up the below as one of the first options.
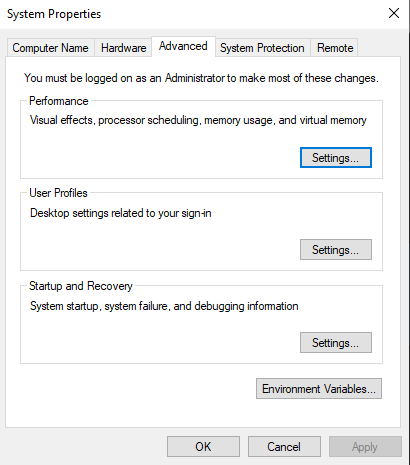
Then, we’re going to click on Environment Variables on the menu that should have pulled up. It should look like this:
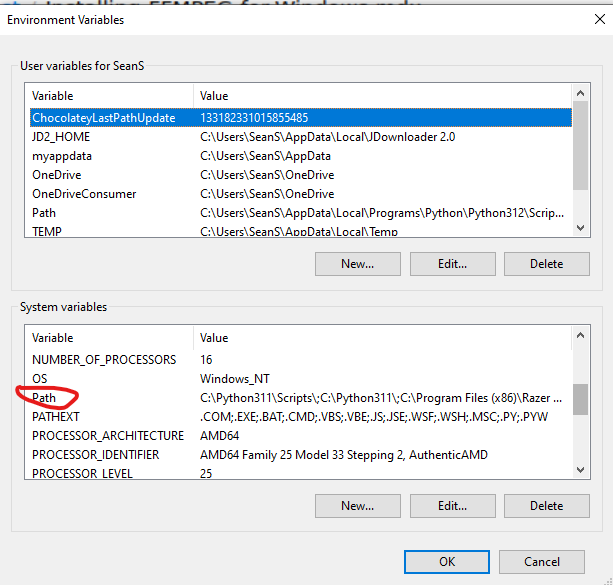
You’ll now want to double-click on the PATH system variable. You might need to scroll down to find it. Just a heads-up: there’ll be a list for User Variables, and System Variables. You want System Variables. Here’s another picture to help out.
- A list should appear of your current PATH variables. You need to now hit “New”, and enter in the file path of the installation directory (aka folder) of your FFmpeg installation. If you named it how I initially suggested, this would just be “C:\Program Files\FFmpeg”.
- Just hit OK now to save that, and you’re done. You can fire up the command prompt and run an
ffmpeg -versionto see if it’s been configured correctly. If you don’t seeffmpeg version 2024-09-16-git-76ff97cef5-full_build-www.gyan.dev Copyright (c) 2000-2024 the FFmpeg developers built with gcc 13.2.0 (Rev5, Built by MSYS2 project)or something similar, then you did something wrong along the way.


Alright, installed! Cool, cool cool…what now?
I’ll probably do a write up on individual operations you can do, but I bet the main reason you came across this was because you were looking for a way to install FFmpeg for media conversion. I’ll give you a quickstart on that as a send-off.
The syntax for such is as follows:
ffmpeg -i ‘filetobeconverted.placeholder’ nameofoutput.placeholder
-i is the option for specifying the input name, which must be the absolute or relative address
of that file.
Absolute would be something like “C:\Downloads\prettyflower.jpg”, while relative would be “prettyflower.jpg”, if the directory you currently are in, in the console window is “C:\Downloads”.
You can supply a wealth of tags and options for specific operations or filters to be conducted in addition to the conversion, but again, that’s a bit out of scope. You can find documentation here, at: ffmpeg.com.
I hope this helped! Like, comment, su—wait, that’s not quite right…