Published
- 16 min read
A Complete Guide to Grim Batol (War Within)
We’ll start with an introduction to every mob in the dungeon, of which there are many, and pretty much all of them are important. I’ll accompany every mobs important ability with a short clip demonstrating it, as well as who in particular the mob is important for, denoted by: Tank, Healer, DPS, or Everyone.
First Boss Trash
Twilight Earthcaller - Earthbolt (Everyone), Mass Tremor (Everyone)
- These are going to be the main limiter in your pull size for the first area. In lower keys/non-fort, it’s not as much of an issue as multiple Earthbolts won’t really matter, but in 10+ keys earlier in the season these will pose a serious threat to your group. Without coordinated CC/a Vengeance DH (lol), having more than two can quickly spiral the pull out of control.
- The Mass Tremor ability however is PRIORITY NUMBER 1 no matter what. On Fort this will do ~50% of the group’s health as well as slow you, which comboed with other abilities can wipe you quite easily.
Twilight Destroyer - Twilight Flame (Healer, DPS), Umbral Wind (Everyone)
- You’ll generally pull these solo except the first pull in the PUG route unless you’re confident in your group. The big thing here is the Umbral Wind, which you can and should LoS every time.
- However, the Twilight Flame spell is a rough DoT and more importantly leaves patches which do a metric ton of damage. You should place the patches away from the LoS point and make sure to have a good Weakaura or alert for when the Umbral Wind is coming up so you can plan accordingly.
Umbral Wind

TL;DR - Put flame patches in good spots, LoS Umbral Wind
Twilight Brute Brutal Strike (Tank), Obsidian Stomp (Everyone)
These are mostly dangerous to the tank in the form of Brutal Strike. The Obsidian Stomps will nearly one-shot you however the higher in key you go (especially, of course, with Fort). However, these are on the easier side. You can stun the Brutal Strike cast, but it will re-cast afterwards.
Obisidian Stomp

Twilight Overseer Rive (Tank), Reckless Tactics (Everyone)
- These will be the biggest threat to the tank in the first area, as they do a scary amount of damage, especially with a bunch of Brutes around. The Reckless Tactics does make everything take more damage though (it’s an Enrage that can be dispelled), 10% to be exact. They’ll also do 20% more damage, so adjust accordingly.
General Umbriss
This guy has undergone the largest changes out of the entire dungeon. It’s not remotely recognizable to its Cata form, and is now reminiscent of the first boss from Halls of Valor.
Abilities:
- Skullsplitter (Tank) - The tank buster of the fight. It’s not that bad compared to most tankbusters, though. Just have active mitigation and be topped and you’ll be fine.
- Commanding Roar (Everyone) - The main mechanic of the fight. The boss will do a good amount of AoE to the group (not enough that, at least from the keys I’ve tested/seen it requires a DR), then summon Drakes to deep breath in 4 vertical lanes. One of the lanes will be safe, and you have a decent amount of time to get there. He’ll do this twice before the drakes go away. He casts this quite frequently.

- Rock Spike (Healer, DPS) - This is the soft-enrage of the fight, although as long as you’re smart about it you should be fine. I strongly recommend to place these as far away from the middle at the start as possible. These leave behind Crumbling Earth, which deals damage and slow you. The ticks are not lethal, but the slow can definitely obstruct you during the Commanding Roar breath sequence. I also advise using your personal damage reduction CDs to overlap these when possible as well, if the healer can handle it.

Strategy:
- Tank the boss near the middle of the room in between roars and ping the location if possible that is safe. Tank needs to be aware of when Skullsplitters come in and pop something to survive it. Healer should keep everyone topped before Commanding Roars and Rock Spikes, and everyone should strive to place the Rock Spikes as far from the middle as possible, preferably towards the edges of the room.
You’ll unlock a respawn point here upon killing him.
Second Boss Trash
Just as in Cata, the second boss will pat up and down this area, and it is important you keep track of him. You can dodge him where a balcony or alcove is available to hide in.
For PUGs, I highly recommend clearing the first two sections of this area, basically killing the first 3 trash packs. If the group is organized however, you may kill the first pack, and fight him once he makes his way over to you. There are only 3 new mob types here, intermixed with some Earthcallers.
Twilight Beguiler - Shadowflame Bolt (Everyone), Sear Mind (Everyone)
Sear Mind

- These are pretty similar to their iteration in Cata. They’ll chain cast Shadowflame bolts, which do a moderate amount of damage. On a +10 and below, they don’t require a tight kick rotation and you can mostly prioritize other spells. Sear Mind is the annoying one. It MUST be kicked or otherwise it will recast at another target (aka, stuns/knockups/displacement only delays it). On Fort and higher keys, make sure to kick any Bolts going off at the same time as Molten Wake.
Molten Giant - Molten Wake (Everyone), Lava Fist (Tank)
Wake + Fist

- They’ll start the pull stunned for a few seconds, so tanks should pay attention as their aggro tends to reset when they wake up. These melee generally pretty hard, and have a big tankbuster in Lava Fist. Molten Wake hits pretty hard, and if you take a stray Shadowflame Bolt or two at the same time you can get comboed. I recommend using group-wide defensives and personals when these come in if available.
Twilight Flamerenders - Shadowflame Slash (Tank), Blazing Shadowflame (Everyone)
These will mainly threaten the tank, as the Shadowflame Slash does an initial hit and leaves a pretty nasty DoT that can stack. Blazing Shadowflame is a line “frontal” that will aim towards a random target. It does hurt quite a bit, and you should prioritize dodging it.
Blazing Shadowflame

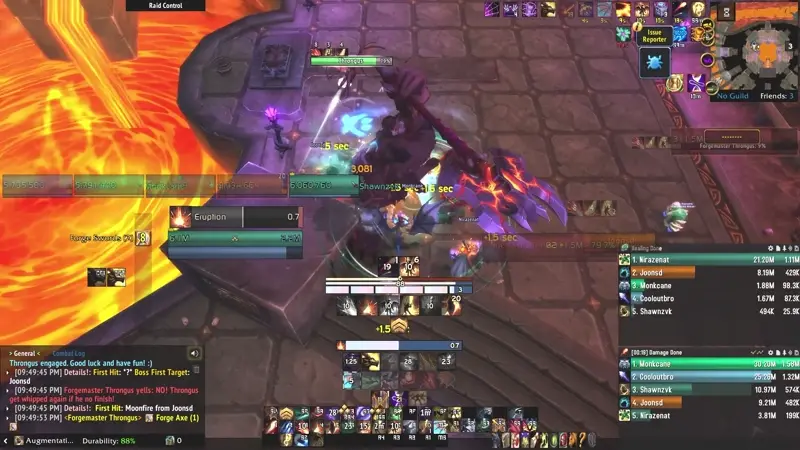
Forgemaster Throngus
This guy is actually not too much different from his Cata version—he’s actually just less annoying now. The main threat here is your space management, which is why I generally recommend clearing half the area before engaging him.
Abilities:
- Forge Weapon - This is a 4 second channel that does a moderate amount of damage. From what I’ve seen, it’s a static order of Axe->Sword->Mace.

- Axe - He’ll face a random target and do a large frontal cone called Fiery Cleave that will leave a fire patch behind.
- Sword - He’ll do a channel on the tank called Molten Flurry that does a large amount of damage. Towards the end of the channel, he’ll also debuff two players with a DoT that leaves a fire patch behind.
- Mace - He’ll do a short cast called Molten Mace, empowering him to do significantly more damage, but in return he will move drastically slower.
Fiery Cleave
Molten Flurry

Molten Mace

After that, he’ll just repeat these abilities.
Strategy:
- You’ll want to tank him at the end of the path you intend to kite him, and move him vertically along it, baiting the Fiery Cleaves towards the outside. The entire group should generally stay stacked during the axe phase in order to bait the cleave nicely. After that, positioning doesn’t really matter, although your healer will likely appreciate you staying stacked.
- Place the fire patches out of the kiting path and towards the edges. Once the tank has kited him fully down the path, simply bait the next abilities into the first fire, and then kite him back down the path and repeat until dead.
- You’ll unlock a checkpoint in the alcove that is to your left in the middle of this room.
Third Boss Trash
This has overall the nastiest trash in the dungeon (although the Corrupters definitely have a solid argument against that). Combined with an overall tight space restriction, this is where I’d recommend playing the safest. It is very easy for you to butt-pull things here and subsequently get clapped. There are 3 new mob types here, mixed in with a bit of everything from the first two areas.
Twilight Warlock - Enveloping Shadows (Everyone), Twilight Bolt (Everyone)
- If you have multiple decurses, these aren’t so bad. If you don’t, these are the main pain point of this area. Enveloping Shadows cannot be kicked, and using stops only causes it to recast.
- Twilight Bolt does a moderate amount of damage, but Enveloping Shadows is the real threat. It puts a massive heal absorb on one players while also afflicting them with a DoT. Combining these with other mob types can quickly get out of hand.
Twilight Enforcer - Ramping Rage (Tank), Rage (Tank)
- These melee extremely hard, and as they continue to land melees (Ramping Rage) increase their attack speed (Rage).
- With a soothe, you can just soothe on CD after about 5-6 stacks. If no soothe, then pop your mitigation on packs with these and use a stop/kite until the Rage falls off. That is all they do, however.
Twilight Lavabender- Shadowflame Blast (Everyone), Dark Eruption (Everyone), Ascension (Everyone), Scorching Heat (Everyone)
- The lieutenant mob of this area, and they are quite nasty. If you’re ever pulling these with other mobs, I highly recommend killing everything else before you push it to 50%. I generally advise against doing so when you can help it in the PUG route. You especially do not want a Warlock alive when this mob casts Ascension.
- The first thing this mob does is a wide frontal called Shadowflame Blast. I generally recommend not fighting these in a super tight space (the second Lavabender is on a bridge, for instance. You should tag it and make it come to you instead of fighting it there).
- Next is Dark Eruption, which will put a circle on everyone and then nuke them a few seconds later. It will continue to use this even after it Ascends.

- When the Lavabender hits 50%, he’ll cast Ascension, which damages everyone in a short distance around him when it finishes and turn him into an Ascendant. He’ll then begin emitting Scorching Heat, doing a high amount of damage until death. Again, he will continue to use Dark Eruptions and also will still Shadowflame Blast during this, and you should use defensives accordingly and liberally.
Ascension + Shadowflame Blast

Do note that there is a double pack of these before the 3rd boss, and you should prioritize killing one first and do everything possible not to push them at the same time.
There are Flamerenders and Beguilers mixed throughout the area as well.
Drahga and Valiona
This is a relatively simple fight, but can quickly get out of hand if not handled correctly. Just like in Cata, the “real” boss is Valiona, who flies away at 50%. You’ll fight Drahga until he reaches 1%, at which point he’ll jump off and summon Valiona.
Phase One
- Shadowflame Bolt (Everyone) - His filler ability that he spam casts until casting something else. Interruptible and you should kick every one that you can.
- Invocation of Shadowflame (Everyone) - The main ability of the fight, but in this phase he’ll only summon one. Just like in Cata, it’ll fixate on a single target and move quite fast towards them. Priority number one while it is alive.

- Curse of Entropy - He’ll afflict two players with this (preferring everyone but the tank), dealing a moderate amount of upfront damage to them and giving them a heal absorb. It’s a curse and dispellable, and you should aim to push the boss before the second cast goes out if possible.
Phase Two
Valiona will keep Invocation of Shadowflame and Curse of Entropy, summoning an additional elemental as well and debuffing an additional player. Valiona will have two new abilities to watch for.
- Devouring Flames (Tank) - A simple but wide tank frontal. The tank should aim it away from the group every time, then dodge out of it.
- Twilight Buffet (Everyone) - After a relatively long cast, Valiona will deal a high amount of damage to the entire group and knock everyone back. She will then summon four tornadoes around her current location that will deal a high amount of damage and knock anyone back who touches them. This always occurs shortly after the second elemental has been summoned.

Strategy:
- In Phase One, simply kick as many bolts as you can while nuking the Elementals as soon as they spawn, slowing them/cc’ing them as necessary. Heal off the absorbs or dispel them if available. Don’t use any defensives here.
- When Valiona arrives, the tank should drag her to one corner of the encounter area and tank her there until the Twilight Buffet. She will always cast the Twilight Buffet after the second elemental is summoned/becomes active, and you should position yourself so that you are not knocked into one if you are fixated by it.
- I also recommend popping a personal for each Buffet when available. Good time for Zephyrs and Rallies. Similar to Fyrakk, the tank should move the boss away from where the tornadoes are spawned and players should move accordingly in order to play freely. The tornadoes can be difficult to see and simply avoiding the area they move in is the best way to deal with them. Again, the tank can and should face the breath away from the group every time.
- Use as many slows and stops as possible to kill the elementals while they are alive. For Melee, you should wait until their fixate line appears before moving to help kill them. The healing absorb can be quite brutal for the healer, so off-heals/decurses help a lot here.
- Repeat this pattern of moving around the four corners until you push Valiona to 50% and she flies away, ending the encounter.
- You’ll unlock a checkpoint here when you defeat them.
Fourth Boss Trash
There are only two new mob types in this area, but one of them is quite brutal and possibly the worst mob in the entire dungeon.
Mutated Hatchlings - Shadow Wound (Everyone)
- These are fairly low health mobs that come in large packs that, upon death, afflict the entire party with Shadow Wound, increasing their Shadow damage taken by 5% a stack. On their own, they basically do nothing. It only becomes a problem when…
Twilight Corruptor - Mind Piercer (Everyone), Corrupt (Healer, DPS)
- Mind piercer is simply a swirly mechanic that you move out of, and you should try not to space yourselves so that players have a difficult path out of the mechanic.

- The real issue is the Corrupt cast, a short channel that deals a massive amount of damage to the targeted player. Personals should be used liberally, and healers should be prepared to pump the targeted players. Feigns/invis/vanish WILL cause the cast to break and put in on cooldown, and you should use them every time that you can.

The final pack before the last boss contains two of these. Pick one and nuke it, and enjoy the -15 seconds as someone’s probably gonna die.
Erudax
This boss can be either moderately difficult, or nearly impossible based on your comp. Having a player that can reliably clear the tentacles will drastically reduce the fight to a healing/defensive check.
Abilities:
- Void Surge (Everyone) - The boss will do a short channel, dealing a high amount of AoE damage and summoning Void Tendrils. Touching one of these (which have rather poor visual clarity), will stun you and deal a large amount of damage.

- Crush (Tank) - High damage tankbuster that also knocks the player a fair distance backwards. You can very easily get knocked into tentacles and get comboed if you are not paying attention.

- Shadow Gale (Everyone) - After a short delay, the room will be slowly constricted to a small area of safe space, anything out of that being covered in shadow that deals lethal ticking damage.

- Abyssal Corruption (Healer, DPS) - Once the Shadow Gale has closed in towards the safe area, Erudax will afflict two players with a high ticking DoT that also splashes its damage to others in a circle around them after a short cast. The group should aim to pre-spread for this mechanic in the safe area while not splashing on to other players.

- Void Infusion (Tank, DPS) - Shortly after the Shadow Gale and Void Surge ends, the boss will infuse the eggs around the room and summon a wave of Mutated Hatchlings (the trash from before this boss). Just like before, killing these leaves you with a stacking Shadow damage taken debuff that will fade away after 15 seconds.
Strategy:
- Tank the boss in the center of the room and pop a defensive every time Crush comes in. AoE damage reductions should be used on the Void Surges while more general damage reductions/group-wide defensives should be used on Abyssal Corruption.
- When the Shadow Gale starts, immediately begin scanning the edges of the room for where the gale is closing in on. Move there as soon as you can, avoiding tentacles along the way. If possible, someone should clear the safe area of any tentacles, but if you don’t have the option simply avoid them the best you can.
- Pre-spread around the safe area, and be very careful not to dip your toe into the Shadow Gale. Doing so will nearly instantly kill you. Pop a defensive/health-pot/healthstone if you get Abyssal Corruption. Shortly after this, the boss will begin summoning adds. Let the tank gather them, and DO NOT immediately AoE them. You should delay killing them until the boss casts Void Surge, otherwise you risk gibbing yourself due to the increased Shadow Damage taken. This is only really a concern on higher keys/tyrannical, but it’s a good habit to get into. The boss will simply repeat after that, the fight getting more and more difficult due to the tentacles.
And that’s it! Now, we’ll go over what I advise for the PUG route, and a route for more organized groups.
PUG Route and Lust Timings
!TAvYoYjmq0)OiVBZ1OiLnjsuOpJgdypHj0nJyGj9Cz(2dyd2TXM(uUy2k)QYv9Q6rjS8uzrF1tQ6XxMVDSSOPvRBRN6gFRmhc(aOS4Vk1FkZfl3(QSBsTSL6PHb1LXpnD5rv)LV2CD2yiAXKxuDZG12FXc3QH)CQRB2KfdgvQZTxESm3a(qRE8hA9lQn))8SLl3Amo8soYTGNxgT3F7hhTFj8vf19D9dLfWAaaP3TTntjXaU6dYnVcgaOg1OO4DoDZuQlwzXqtIHomwZiuAJyNn3gfwO5Xq7)inaXAIMbAwSMgJOighwWUPvurw1InS4DN5CPHWyYgZ0HTdAo0fo5q8g25qY2jihsJ9p3bQWHzMhsGhsOhsKhsSBRwhz2lK73muetyG7jyKD8b7hjUhPUhzUh5bzoPUrtrlyXxXcFmHsdRy1l2kS2qpK8Bxw5rSd5rYM6Qm2InzXigsrTiYJrehgJyagAq0KgpTJ9TwjZUdDDdjsMKPnTpWn20D61GaUKAmgLWTSy3kCUnlajbRgWKgKWX5e4b0UD5KWGJHa4k7jHKasGD)I7mjBdPkcxQmwd3GaCyXDUqGHqJXRXgpEEywCK4kaOgPWMj4jc7va4XJef76t35MDJYQqCU1lIehPWZVuvri2mzccl03ccjX(DhrLHK2bEOv)jsuucILWQkeO52UremrS47EsX(ihmgUstP4mdOOezJJ2wwTqRmLA024d6HboHriC7jpfD0pzDBeiF3qHDLyi6UP9qLcOudZmLB0QxXrcFB2IHzCHrvbT1CLwNlXyp7c1TWClC3IWRT5yfaPuyewr8eU8)Ju2QUZkTaIoUsbH0gdDhjsLa2vQwdhVmiYldI8YGiVmiYldIijcNWwvkQcWTSSSeHdYt5rEfdtECnCe(WjZRRaCHd2pzg7gnNJVrshFJMo(grDmor0hQiFZ5GrO2gaST5Yn7hvvJxiC()mTyQQt9QQZvAgvxNx)8q753F4JYX(U3F4K68Z9dYH3E)HF1pnQklo30UaREqP(DFxZ36BVOAkR8Vz9NDRupo12z(D3v4NABklojFImD(lxV(9pp)UY)bThe above is an MDT string. Just hit the copy button and paste it in-game.
Here’s what it looks like at a glance.
And then here is a route I think a better organized group would have success with.
!nA1sVXjmq4)rv432xRQAvBL2wfYLEbfaBNsd7selKU5s(T3fd4bJ9g1lZYcFEMV5Tlqf3xK3v9ht9W5RpouKRBS2M6X2HxloG)qwr(FnMNkoqME8LY2rZ0jQh77nNg(04PhnDN(Q(sXbeYH(SP9QUA6onRTfG)CST9kKjadgZXMtpwCiB6F9n2HFyTNnRM)5RiNE0bo8hhDMfeVGEvmm)20WgM)z7hhMp26RqUxLx3121xKJSYSs5oDUcL5vnp2U0yvJdunptwBP7y0wwmRAH35KXgbGX8W4bwXwsQq8Dmz94k)XrzXkxehVib6U2QQl1tyyZycOge4rqccLiSWd8vq9ydMGvtO5jcqGRJGIaej2nKEGkaNynfDajJzeXFeAyktxXRQMqlsWikWiwIuvg8zuSjzbgILH0CZeg5cgYnlrTuRTQEcRAgd7)RjHFZktkNQ0LtyCKEFIDX5u3SCf0KsO0sx7dcftUW(NzYjIjxyrhTeBRNvjob54XKlSayB5lxqzonrIjh4ssp5uXKlmxuXyzgKtLRj3BpBrLvJkDvtiwc7V0rkIhxjFVXBQe6ynnMixl0i1s4KNGe4ysG2Br570lhqNDZ)WLsb2z5f1lFNKwOpewsirizPBghsMWhGU51PpYeXivK6dnzyUJvBKw3OpuIUoeuzNQGKgm1guAwTQK72iGNTSVsHQSlFyDId72utiQ1eh4Lods8APGJla2kJZ3SeXmCuivTRia4JUwRjZKFLiP30Lym1SG5fCVq4fsVq5fZdBxKB2xG2SWar2iPBKSns(2CicFZGovsug3SemnLtUleVSfsbvdzWaXnnsWnaWeORGMGo7NGxRWU5qywc6GH6tmm6fdlfXsGokyaDgCHeOjLSz3kbc7eke2jSn7PtfmV1cxPjZMnfwHlpMpw1AEX06ZadMlxLFPV54Bp8XYHU23E4EZXN76l7F9ThURBCWuKFu3m1pz7nMF31Q)wxZjJUOcEZY9rRmpo206Ur6I6hB0f5)sC(ZpDx3LlF)lxFxX)a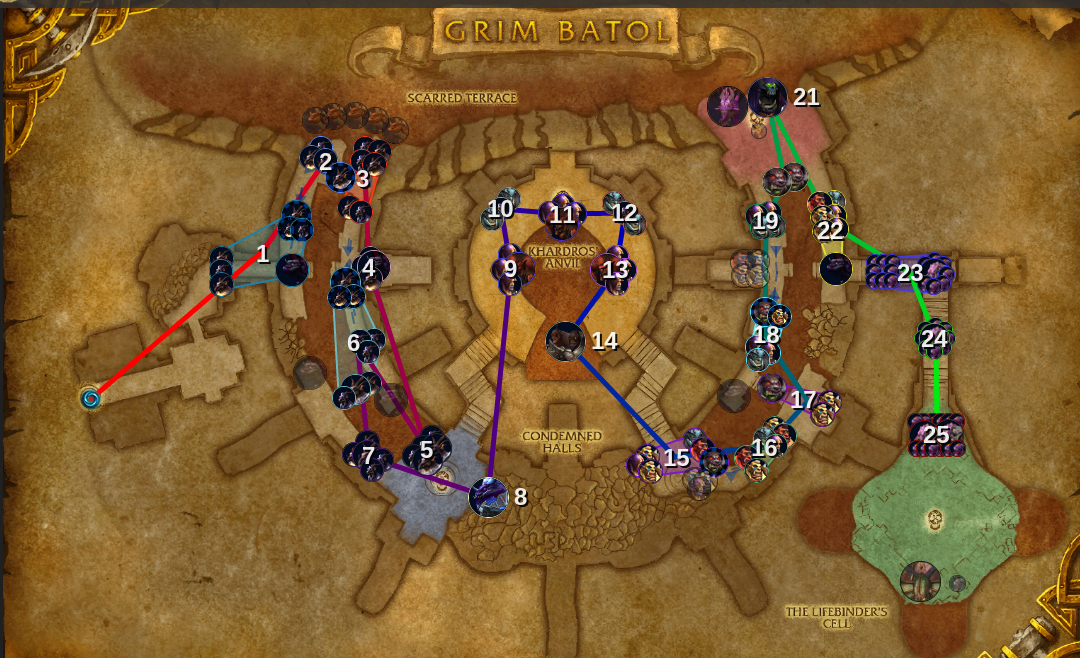
Lust Timings
I’d recommend lusting as follows:
- First pack
- On CD for hard pull/second boss, whichever is first
- On CD/last boss
- Last boss