Published
- 12 min read
A Complete Guide to the Cauldron of Carnage
Intro
Mythic ability previews were clipped from Instant Dollar’s monk Milli.
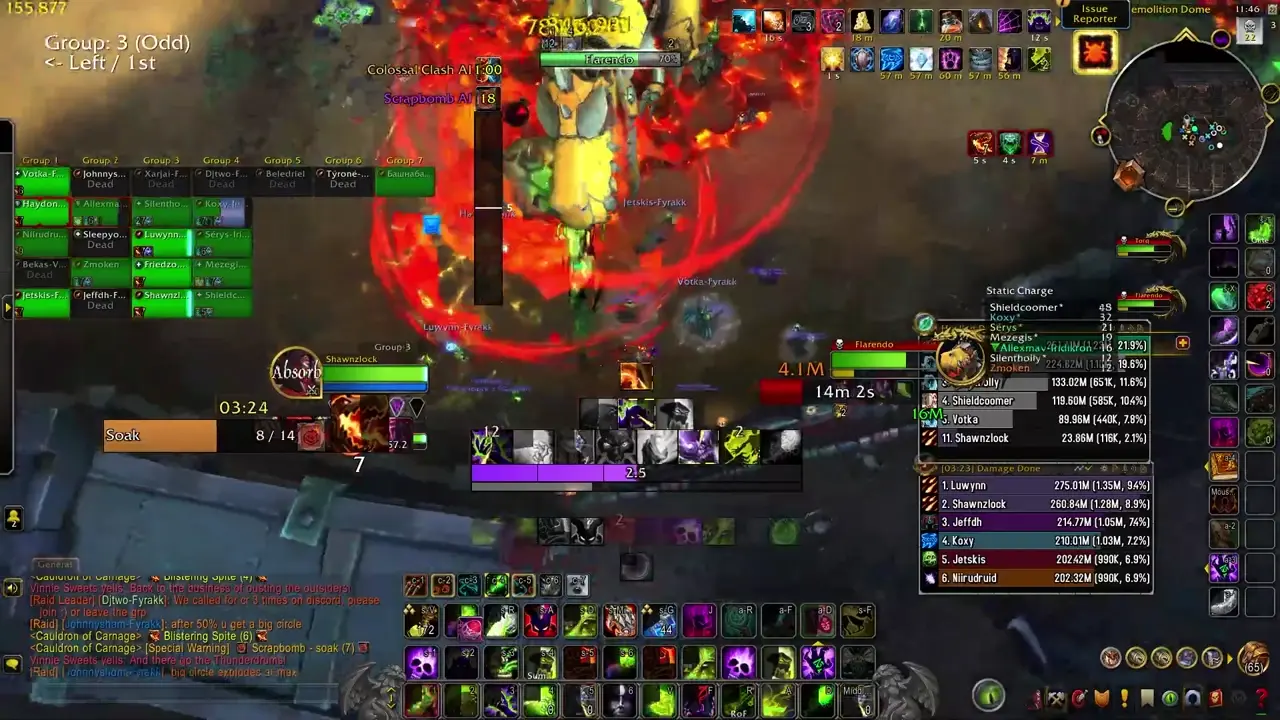
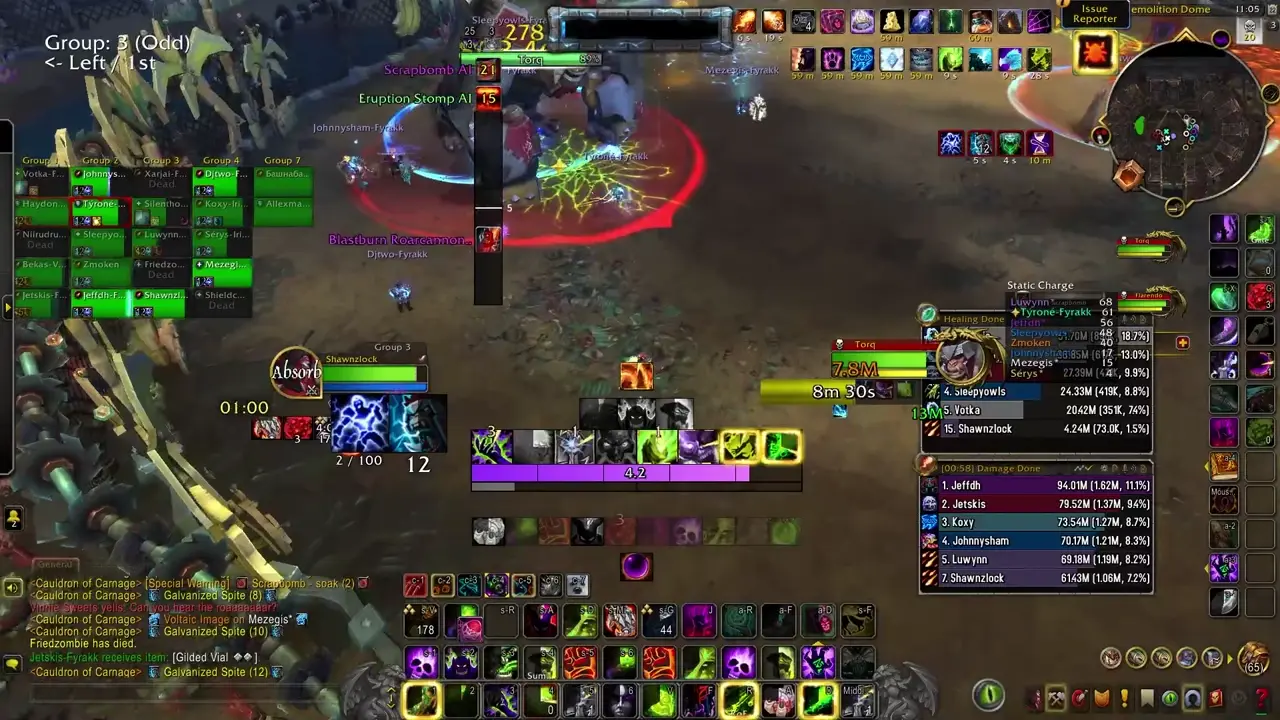
This is a single phase encounter against two bosses, Flarendo the Furious and Torq the Tempest. These bosses do not share health and have wildly different skill sets, and must also be tanked apart by a minimum of 40 yards. Both must die around the same time. Both should be tanked where they spawn and the raid should be split into two teams to handle each boss. You may find it desirable to make certain both teams have an equal amount of crowd control for reasons explained further in this guide.
At regular intervals, both bosses will Clash in the middle for around 20 seconds, providing the best opportunity for each team to swap sides (which you must do, as it is not feasible to simply have each tank taunt over the other boss due to the way the bosses behave).
Full List of Boss Abilities for Reference
All links sourced from Wowhead through their generous API
- Galvanized Spite
- Blistering Spite
- Colossal Clash
- Zapbolt
- Fiery Wave
- Tiny Tussle
- Raised Guard
- King of Carnage
- Scrapbomb
- Molten Phlegm
- Blastburn Roarcannon
- Eruption Stomp
- Tempest Unleashed
- Static Charge
- Static Discharge
- Thunderdrum Salvo
- Voltaic Image
- Lingering Electricity
- Lightning Bash
Important Abilities
Shared
- Blistering/Galvanized Spite - Each boss places a stacking debuff on all players near them (40 yards).
-
- Colossal Clash - At full energy, both bosses will turn to each other and charge, clashing for 20 seconds. During this time they will still debuff anyone in range with their respective Spites, but will cease their regular abilities. Instead, they will radiate raid damage and continuously spawn swirlies and waves to dodge.
-
- Raised Guard - When both bosses are within 40 yards of each other, they gain a 99% damage reduction.
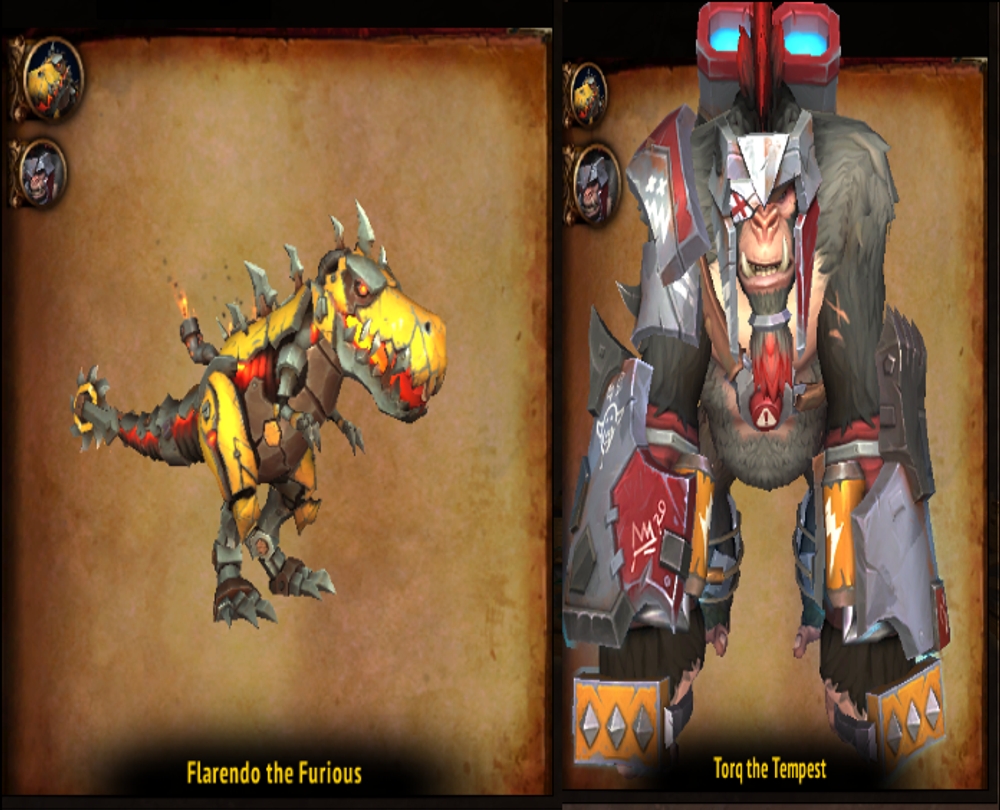
Flarendo the Furious (I will henceforth refer to him as Dino or Dinosaur)
- Scrapbomb - The dinosaur will place a moderately sized bomb on the ground. After some time (about 10 seconds), it will explode, dealing damage to the entire raid, reduced by each player who soaked it. It will also knock back all players who soak it, the knockback originating from the center of the soak. Afterwards, it will leave a pool that remains until the encounter’s end.
-
- Molten Phlegm - A majority of the players on the dinosaur side will receive this debuff. This DoT causes them to pulse damage to everyone around them for 10 seconds.
-
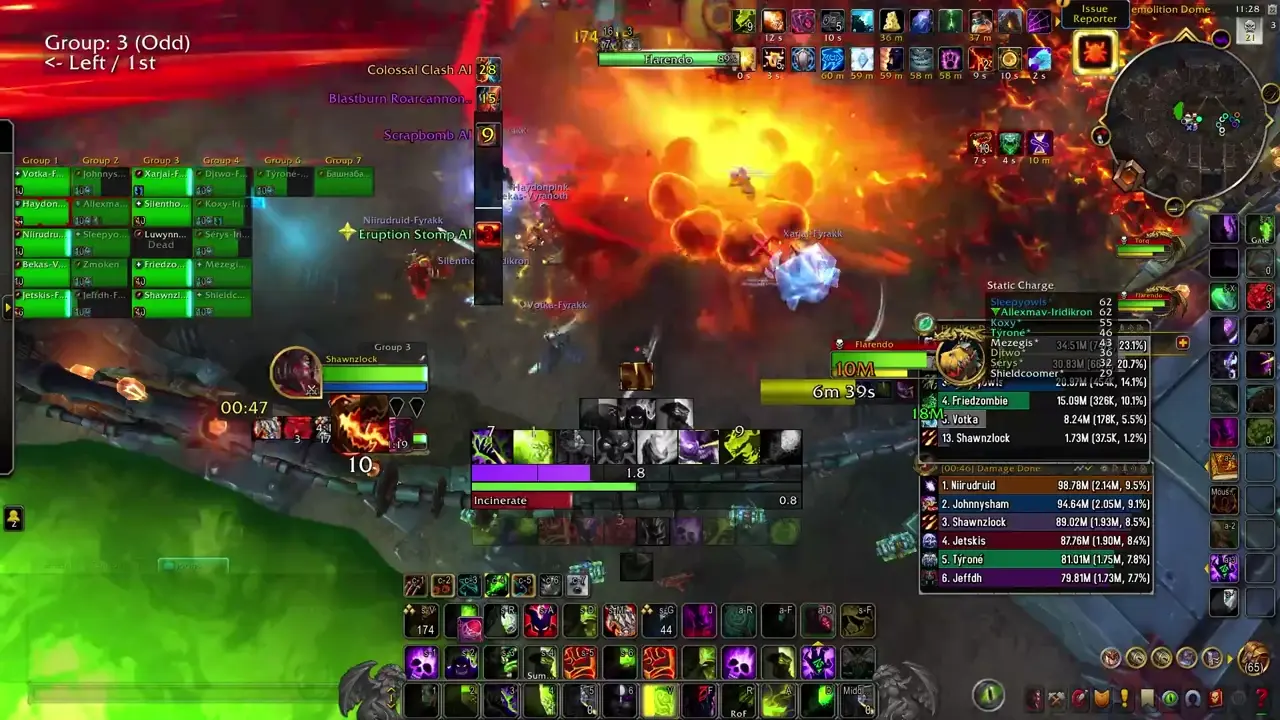
- Blastburn Roarcannon - The dino will focus one player, charging a beam at them over a few moments. After the beam is charged, he will lock his aim in place, giving a brief chance for that player to move out of the way. He will then fire, killing anything that is caught in the blast.
-
- Eruption Stomp - The main ability the dino uses on the tank. This will launch the tank high into the air, spawning Rashok style Fiery Waves outward from his location.
Torq the Tempest (I will henceforth refer to him as Monkey)
- Static Charge - All players within range of the monkey will receive a debuff, allowing them to accumulate Static Charge. While moving, players generate charge. Remaining still depletes this charge. Reaching full charge will trigger a Static Discharge, stunning everyone in a 10 yard radius on Heroic and higher.
-

- Thunderdrum Salvo - The monkey will fire a barrage of swirlies at everyone on his side, doing high damage to anyone hit.
-
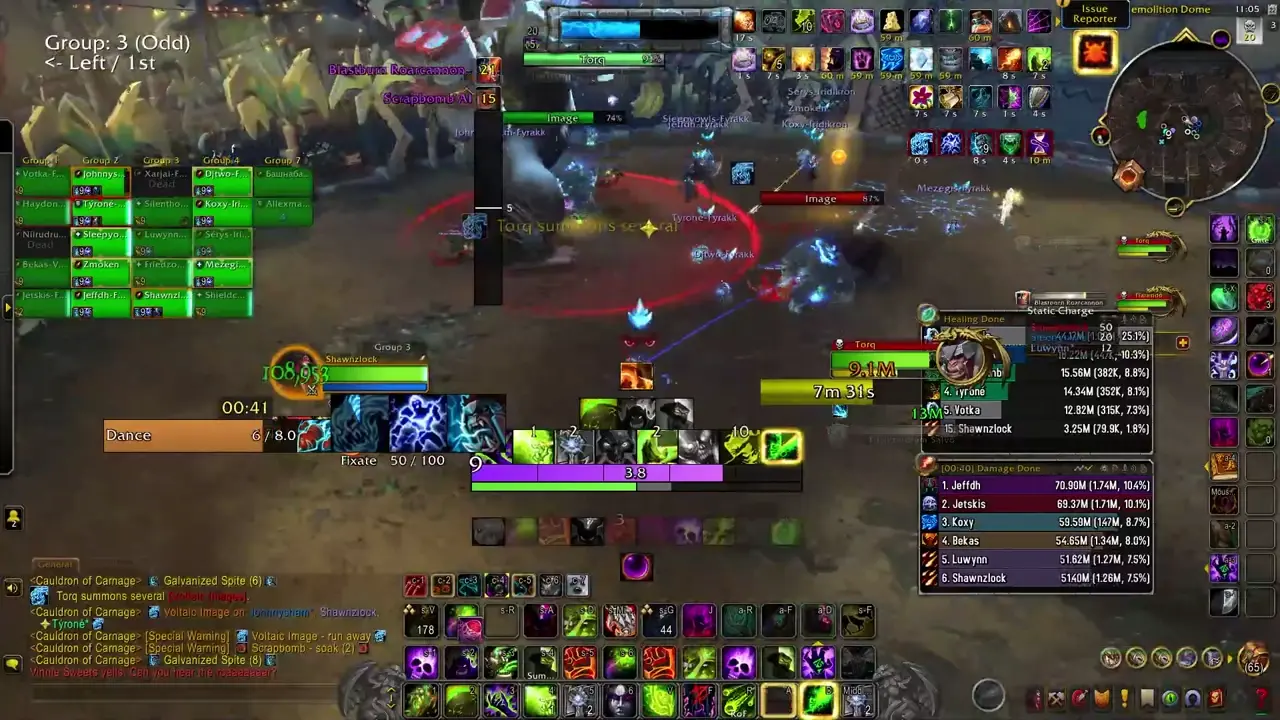
- Voltaic Image - The monkey will spawn several images of himself, about 3 as of writing this. These images will spawn towards the edges of the arena and fixate on a single player, moving towards them over 12 seconds, after which they will despawn. If they make contact with anyone, they deal a burst of damage to all players in melee range of them and leave a silencing pool that also deals light damage for the duration of the encounter.
-
Strategy (Normal and Heroic)
- Lust on Pull
- Split the raid into two teams with an equal amount of tanks, healers, and dps. As said previously, you may want to consider how much CC each team has on Heroic and higher in order to make the Voltaic Images less of a headache. Warlocks are incredibly good for this purpose, as they can Banish, Fear, and Mortal Coil. Druids and Monks are also good for similar reasons.
- There is no need to swap teams outside of Clash. The debuffs will fall off naturally from simply swapping during each Clash. There will be a period where you have both DoTs, and so this is a good time for defensives and raid cooldowns if needed.
- Due to the constant movement during Clash, it is not recommended to Lust here.
- On the dinosaur side, the Scrapbomb tends to prefer ranged, so you want the entire team stacked up against the edges of the arena on pull. Bait each bomb and move as a group, and on Heroic and higher spread immediately after for the Molten Phlegm, making sure to quickly move back into baiting formation before the next Scrapbomb cast.
- Blastburn Roarcannon is cast during every Scrapbomb soak, at varying times during it. There should be a very clear agreement on how to handle this. You may choose to either have the person bait the beam completely outside of the bomb, just inside of it, or on one dedicated side of the bomb. Whatever you choose to do, make it very clear what they are to do with the mechanic.
- Again, as the beam happens at varying times during the Scrapbomb, sometimes the picked player will also need to be cognizant of the Scrapbomb knockback. They should make sure not to be knocked back into the beam they just baited, for instance. The other players should also take care not to get knocked into the beam as well, if they might be positioned for this to occur.
- The tank on the dinosaur side should also soak everytime as well, but be aware of the Eruption Stomp timing, so that you do not cause the waves to spawn close to the more fragile players in the raid.
- On the monkey side, you will either want to commit to having everyone stack relatively close and moving as a unit, or staying spread around the boss. For the sake of keeping things safe, I would recommend just having everyone spread out.
- Melee, however, should likely just stay as a single unit and rotate either clockwise or counter-clockwise during each Thunderdrum Salvo, with the tank opposite of them and moving similarly.
- You can bait up to 3 Salvos before needing to move, but I recommend only moving every 2 to be safe. When movement is not needed, do not move. It is that simple.
- For the Voltaic Images, make sure players are aware that they spawn towards the edges of the arena or more at range, and that they can be instantly detonated if a player stands where one might spawn and does not immediately move. Otherwise, simply CC the Images until they time out after 12 seconds.
Mythic Changes
Mythic introduces nothing that changes the fundamental strategy whatsoever, but it does present some increased complexity and additional healing load to the fight.
- Tiny Tussle - Toys of both the dino and monkey will be thrown into the arena during the normal part of the encounter. These toys cannot be targeted or interacted with normally. They can only be moved by running into them, and they will be launched opposite of the interacting player’s direction. If any toys are within 15 yards of the opposite type, they will Clash, destroying themselves and applying a high damage DoT to the raid. When the bosses themselves Clash, ALL toys will clash, no matter their location, and the DoT applied will do 500% increased damage.

- Blastburn Roarcannon now has 3 beams in a frontal pattern, instead of 1. It still only picks 1 target.

- The monkey will now call down Zapbolts throughout the entire encounter, instead of just during Colossal Clash, increasing the movement required. Occurs only on his side of the arena.

Mythic Strategy
- You will now need players on each side to handle kicking the toys towards the other side. You will need to physically walk into them in order to kick them, and it usually takes at least two kicks to get them where they need to be. This of course is far more annoying for the monkey team, which is already restricted in their movement.
- As of writing, there are 3 toys on each side. You will need to stagger their destruction, but also make sure to eliminate them all before the Clash, or you will almost certainly wipe.
- For the other changes, the Blastburn Roarcannon just needs to be baited further than you did in Heroic. You may choose to handle it almost completely the same otherwise.
- The additional Zapbolts increase the movement required on the monkey side and require smarter positioning and awareness, and can overlap badly with some mechanics. Simply handle it as best as you can.
- The success of your raid hinges mostly on the players assigned to do the Toys. They should make sure that they do the Toys in between casts of Scrapbomb and Thunderdrum Salvo. Also, be aware there is a visual bug where it will appear as if you have an extra Toy without a matching pair. Communicate often and ask for help if necessary.
Notes on Healing
This encounter is not particularly stressful to heal except for during the Clash, due to the movement required. Still, on Heroic it is not a particularly high amount of damage as of current tuning, but likely still the best place for larger raid cooldowns to be used. The damage profile is very light rot with predictable bursts of damage on the dino side, and during Molten Phlegm it changes to moderate rot. On the monkey side there is a light amount of damage going out with occcasional spikes when the Scrapbomb detonates.
When playing with lesser skilled players, it is not a terrible idea to hold some healing in case they are struck by errant mechanics to quickly top them off and prevent death, as nothing will outright one-shot you.
On Mythic, there is much more to heal and the later Clashes can be particularly stressful. It is advisable to find a location that other players seem to not inhabit and plant around there, moving as little as needed in order to pump HPS. Getting a feel for the timing of the toys clashing is also a vital part of properly anticipating the healing required.
Particular moments of danger are the later Scrapbomb sets of a phase, when everyone has high stacks. Monkey side should be especially aware of this and be prepapred to personal as it is easy to be caught off-guard.
Notes on Tanking
There is very little tank damage on this fight, and no taunt swaps or anything of that nature. You will simply swap bosses when you swap sides during the Clash. If you start dino, then after the Clash you will take the monkey and so on and so forth.
The Eruption Stomp should be handled away from your side’s members, and on the monkey side you should strive to remain opposite of the melee clump and rotate the same direction they do in order to avoid them (as in, if they are going clockwise, you go clockwise). While I say that there is no tank damage, you should still pop something for each Eruption Stomp as that can easily result in your death, and be aware that Blastburn Roarcannon is quite fatal to tanks as much as it is to DPS/Healers.
Defensive Usage
As I mentioned in previous sections, there isn’t anything truly threatening on this fight from an unavoidable standpoint. Your best bet is to simply defensive any bad Scrapbomb overlaps, such as those where you observe only a few players reaching the soak in time. It is also fine to defensive during the Clash to reduce the healing load or if you are out of range of the healers at any time. You may also choose to proactively use defensives if you feel you are less than capable of dodging properly during any mechanic.
Movement Cooldowns
There should always be at least one movement cooldown used during Clash, and preferably you would want a second one chained into that to last for the duration of the mechanic. I also recommend placing gateways for players to take to the other side so they can begin planting and DPS’ing while both bosses are together as soon as possible.
Movement is also helpful during Molten Phlegm to help players spread out as quickly as possible and to return to their positions for baiting.
Damage Profile Best Suited for this Encounter
This is by and large a single-target encounter. It is quite a bait to take any cleave where it is a substantial loss to your single-target to do so. On Heroic and lower (and Warlock/Spriest/Boomkin players will want to do this on Mythic because of the one log they saw do it), it is fine if not outright expected that multi-dot/spread cleave classes such as Aff/Destro/Spriest/Boomkin should stand in the middle to squeeze in extra damage during the opener, and again, if it is an overall increase to do so you should cleave during the Clash.
Raid plan, Useful Weakauras, and Macros
- Raid Plan for Normal and Heroic
- Raid Plan for Mythic
- No fight specific macros or Weakauras. Refer to the Resources and Weakauras page
Table of Contents
- Vexie
- Rik Reverb
- Stix Bunkjunker
- Sprocketmonger Lockenstock
- One-Armed Bandit
- Mug’Zee
- Chrome King Gallywix