Published
- 9 min read
(Updated) A Complete Guide to Sprocketmonger Lockenstock
Intro
Mythic ability previews were clipped from Instant Dollar’s monk Milli.
This fight takes place in a rather small room with 3 conveyor belts running vertically down the arena, and a few much smaller ones running horizontally. There are plenty of areas that do not move, allowing you to safely stand there without being forcibly moved, but the various mechanics of the fight will cause you to move from these spaces quite frequently. It is a single phase encounter with a short intermission in which you mostly dodge swirlies and attempt to reach and damage the boss.
The main theme of this fight is dealing with the various inventions that Sprocketmonger uses, of which there are 3: Rockets, Lasers, and Cannons. On Heroic and higher, much of the fight also revolves around managing the Foot Blasters and making certain they are all destroyed before they all detonate naturally.
Full List of Boss Abilities for Reference
- Activate Inventions!
- Blazing Beam
- Rocket Barrage
- Mega Magnetize
- Jumbo Void Beam
- Void Barrage
- Unstable Explosion
- Unstable Shrapnel
- Wire Transfer
- Screw Up
- Screwed
- Sonic Ba-Boom
- Blisterizer Mk. II
- Pyro Party Pack
- Gravi Gunk
- Beta Launch
- Bleeding Edge
- Voidsplosion
- Black Bloodsplatter
- Upgraded Bloodtech
Important Abilities
- Activate Inventions - Sprocket will…activate his inventions. As of this writing, he does this in a specific order on all difficulties, which for the moment is Lasers->Rockets->Magnets.
- Lasers
- Rockets
- Magnets
- Foot Blasters - On Heroic and higher, Sprocketmonger will spawn these in waves of four, and will happen twice throughout each standard phase. These must be detonated in a staggered fashion, as they deal raid-wide damage and apply a debuff increasing damage taken from Foot Blasters for 2 seconds. Players also receive a debuff that makes it lethal for them to soak another mine for 2 minutes.
-

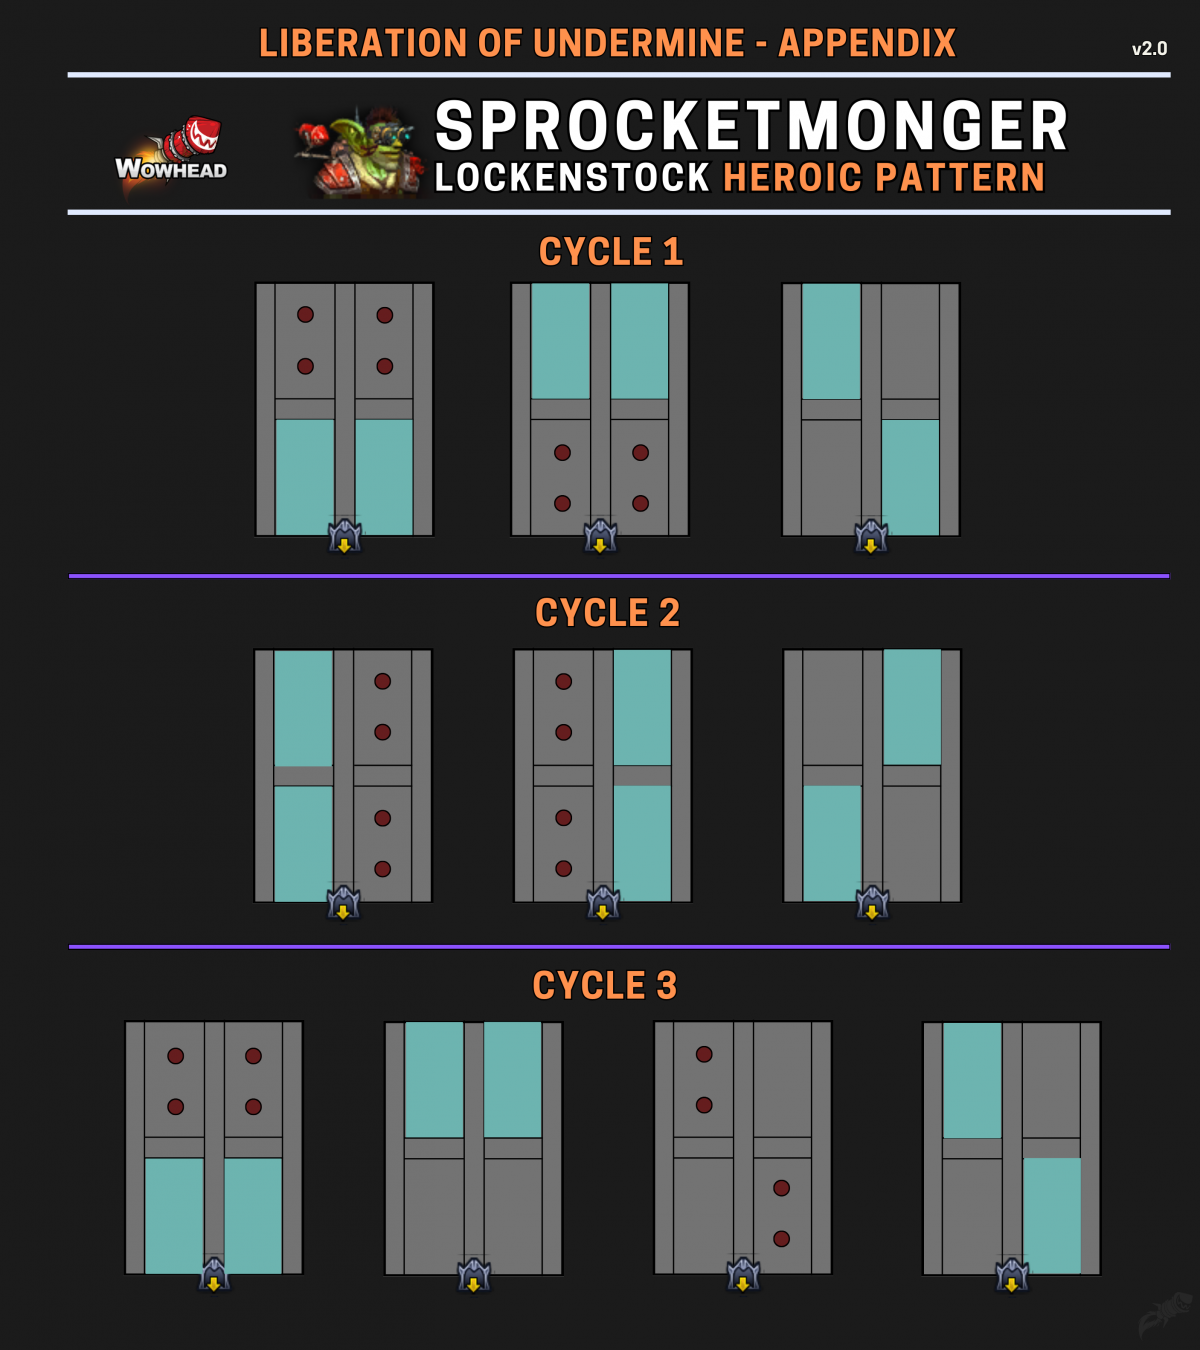
- Wire Transfer - Throughout the phase, Sprocket will electrify different sections of the room, dealing high damage and slowing anyone in those areas. This forces you to do the fight in varying locations, but the order is static much like the inventions.
-
- Screw Up - Sprocket will mark several players and cause drills to erupt below them after a moment. These drills stun anyone they touch, and persist for a fair bit of time. You will want to bait these away from the raid, as they are quite annoying.
-
- Pyro Party Pack and Gravi gunk - The main tank mechanics. Gravi Gunk is a slow/damage taken debuff that stacks on the current tank. Sprocket will also apply the Pyro Party Pack to his current tank, which does fall-off damage to the entire raid. Simply move to a location moderately far from the raid and let it detonate there.
-
- Beta Launch - Sprocket will cast this at maximum energy, knocking back all players backwards from him. During this time, he will rain down swirlies and emit raid damage, and the middle conveyor belt will have traps that launch players in the air. He will channel for 20 seconds before gaining a 15% damage buff and empowering a weapon type for the next standard phase. He will empower his Lasers, then his Rockets.
-
Strategy (Normal and Heroic)
- The static nature of this fight makes the strategy rather simple. On Normal, there isn’t much to the fight beyond simply dodging, so much of this will be aimed at the Heroic version of the encounter.
- Managing the Foot Blasters is what will allow you to overcome Sprocketmonger. Obviously, since everything is static, you can simply assign players to soak each Foot Blaster wave. There are four mines and four static locations, and you can put markers down at each and have them trigger each in staggered fashion while waiting for the raid to top itself in between.
- The Foot Blasters do trigger from other mechanics in the fight, which tend to be more from the back of the room, so those are the ones you want to trigger first.
- Make it clear that everyone else who is not triggering should not touch these at any point unless needed.
- Screw Ups can massively complicate movement if handled incorrectly. Ranged should pre-spread opposite of the boss’s current location to easily bait the Screws away from melee. If melee get it, they should stop whatever they are doing and immediately sprint to BFE, but also out of the path the boss will be taken through.
- As a further note on Screws, one thing I find quite good to do as ranged is to simply go on the conveyor belt. It will carry you safely out of range of the individual screws meaning you don’t need to stop casting. This is what it looks like:

- Tanks should swap at around 5 stacks and save movement for taking the Pyro Party Pack out of the raid.
- Beta Launch is really quite annoying. A warlock gate helps immensely in getting to the boss, and you should also stand on the safe zones which are the rails on the sides of the Conveyor Belts. As of this writing, this basically trivializes the mechanic.
- During the Beta Launch, you should aim to be knocked towards the side that the boss will teleport to, which is static. The boss will teleport towards the back right of the room, so ideally you could just let yourself get knocked there. You may also choose to just tank the boss in the middle just before the Beta Launch and then use gateways and movement speeds to reach him. For the second Beta Launch, you should naturally be on that side of the room, and just need to get knocked against the grates and run along the side conveyor belt to reach him.
- The most difficult part of the fight is the second standard phase with empowered
Mythic Changes
The Mythic changes to this encounter enforce a strict movement pattern reminiscent of Silken Court from Nerub’ar Palace, and while it does not entirely transform the encounter, it plays much differently and further emphasizes proper baiting and spatial control.
- Polarization Generator - Sprocketmonger will begin the encounter by marking half the raid Positive, and the other half Negative. Contact with another player of the opposite polarization will cause a Polarization Blast, knocking both back and causing them to take very high ticking damage over 8 seconds. He will also swap some members Polarization throughout the phase.

- Foot Blasters now are polarized as well. They may only be detonated by those of the matching polarization. If a player of the opposite polarization attempts to detonate them, it deals massive damage to the raid, likely wiping it. There is also an additional set, so 12 players need to detonate now, up from 8.

Mythic Strategy
- It now becomes exceptionally important for every player to have an idea of how and when best to pop Foot Blasters. The Polarization is entirely random, although there seems to be some caveats (especially regarding melee), meaning you cannot have a 100% guaranteed order of popping the Foot Blasters. As of writing, we simply yolo called this during testing, but there will be a Weakaura that solves much of the assignment complexity and likely you will just listen to your raid leader tell you when to detonate.
- Because of the separation caused by the Polarization, you must now be especially careful where you bait and take certain mechanics. There should be agreed upon locations on where exactly to take Screws, the tank bomb, and where best to dodge to during the standard phase.
- During Beta Launch, both teams will still be knocked back, and this can be a very tense part of the encounter until the movement is fully learned. Both teams will need to agree upon their paths to take towards the boss ahead of time, and melee will simply need to do their best to get uptime without killing any other players.
Notes on Healing
Once again, there is not much healing to do on this encounter as of writing. The damage comes in extremely predictable patterns and there is basically no rot on this fight (on Normal and Heroic). The main damage to heal is the explosions of Foot Blasters, Sonic Ba-Boom, and the Pyro Party Pack. The Magnet invention also does a fair amount of damage and tends to occur just after a Sonic Ba-Boom, so this a point where without raid cooldowns the health frames can get a little sketchy.
On Mythic, range and the increased tuning can become a concern at times, but still, the lack of any real rot makes healing the fight quite simple, however it can become quite bursty as the boss acquires more stacks of his damage buff from Beta Launch. You will want to make certain you are ready to fully top the raid in between Foot Blasters and Sonic Ba-Booms, or you risk falling behind and losing players to stray damage from Rockets or the like.
Notes on Tanking
You will essentially control the fate of your melee on this encounter, as it is your responsibility to move the boss into the safe areas. You should have a clear understanding of the order of the Wire Transfer and when and where to tank the boss at any one time.
The tank not currently taking the boss should take the Pyro Party Pack, and thus not have to use much to survive. Basically it goes, Tank 1 is tanking->Boss casts Party Pack->Tank 2 taunts during the cast, takes Pack out, explodes, comes back and taunts off. Then they keep the boss until the next Party Pack.
Refer to the Raid Plan section for the pattern.
Defensive Usage
Defensives are best used whenever you may be forced to pop Foot Blasters especially close to a Sonic Ba-Boom or tank explosion, or during the Magnet invention as healers will find it difficult to heal while being dragged in at times. You may also elect to use them during Beta Launch if you are not confident in your dodging capabilities.
Movement Cooldowns
Gateways should be placed ahead of time for the intermission, which is what they are best used for, or for the very first Wire Transfer of the phase. Movement cooldowns are also quite helpful when swapping sections or during the Magnet invention, as the drag can be quite annoying for less mobile classes.
Even with gateways, you should save at least one movement cooldown for Beta Launch every time.
Damage Profile Best Suited for this Encounter
As this is strictly a single target encounter, you should simply bring the classes your raiders are both most comfortable on and skilled at doing damage on, while covering all the raid buffs available to you.
Raid plan, Useful Weakauras, and Macros
- I could make my own diagram, but I think the WoWhead one is better.
- No fight specific macros or Weakauras. Refer to the Resources and Weakauras page
Table of Contents
Feedback or opinions? Drop them here in the discord thread for this post!