Published
- 17 min read
A Complete Guide to Dimensius
Within and without the depths of the Manaforge waits Dimensius, the All-Devouring, Lord of the Void. The fight to defend reality against his all-consuming hunger is a multi-stage saga in and of itself that will see your raid battle against cosmic wonders and horrors alike, aided by the power of his once-devoted Harbinger, Xal’atath.
Abilities
As this encounter—like all endbosses since The Jailer—was not available for testing, I will do my best to represent what the fight should appear like using what we know from the dungeon journal and the datamined area map. Some of this will likely be wrong, but you should at minimum leave with a solid grasp of the fight mechanics and how the fight should play out.
I will start by saying that the Phase One area is surmised to be similar to Volcoross or the Wrath of Azshara, in that it is a large, circular ring with the boss sitting immobile in the center. Because of the various mechanics, it is quite likely you will need to split the raid in two, but more on that later.
Phase One
- Oblivion - Coming into contact at any point, whether due to the fight mechanics or from mistakenly assuming the All-Devouring does not live up to his name, will instantly kill you due to differing local gravitational forces.
- Fists of the Voidlord - Dimensius’s melee attacks curve spacetime in such a way that all futures lead to him for his current target, forcing them into melee range if they are not already within it, dealing damage and knocking away any players within 15 yards when this occurs.
- Massive Smash - Dimensius smashes his current target, inflicting a moderate amount of physical damage and a light amount of cosmic damage to them and anyone within 20 yards. All players outside of this effect are knocked away from the impact location, suffering light cosmic damage. This also scatters Living Mass across the battlefield.
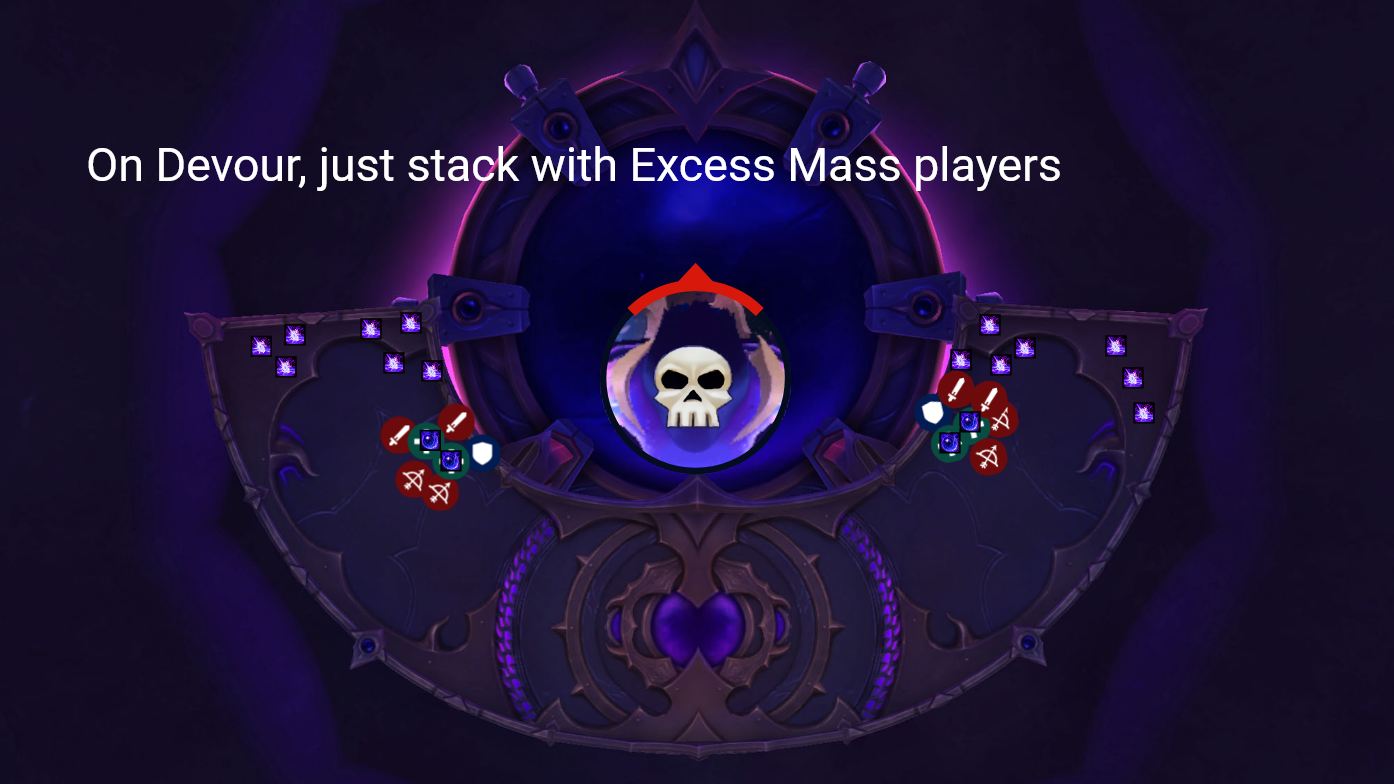
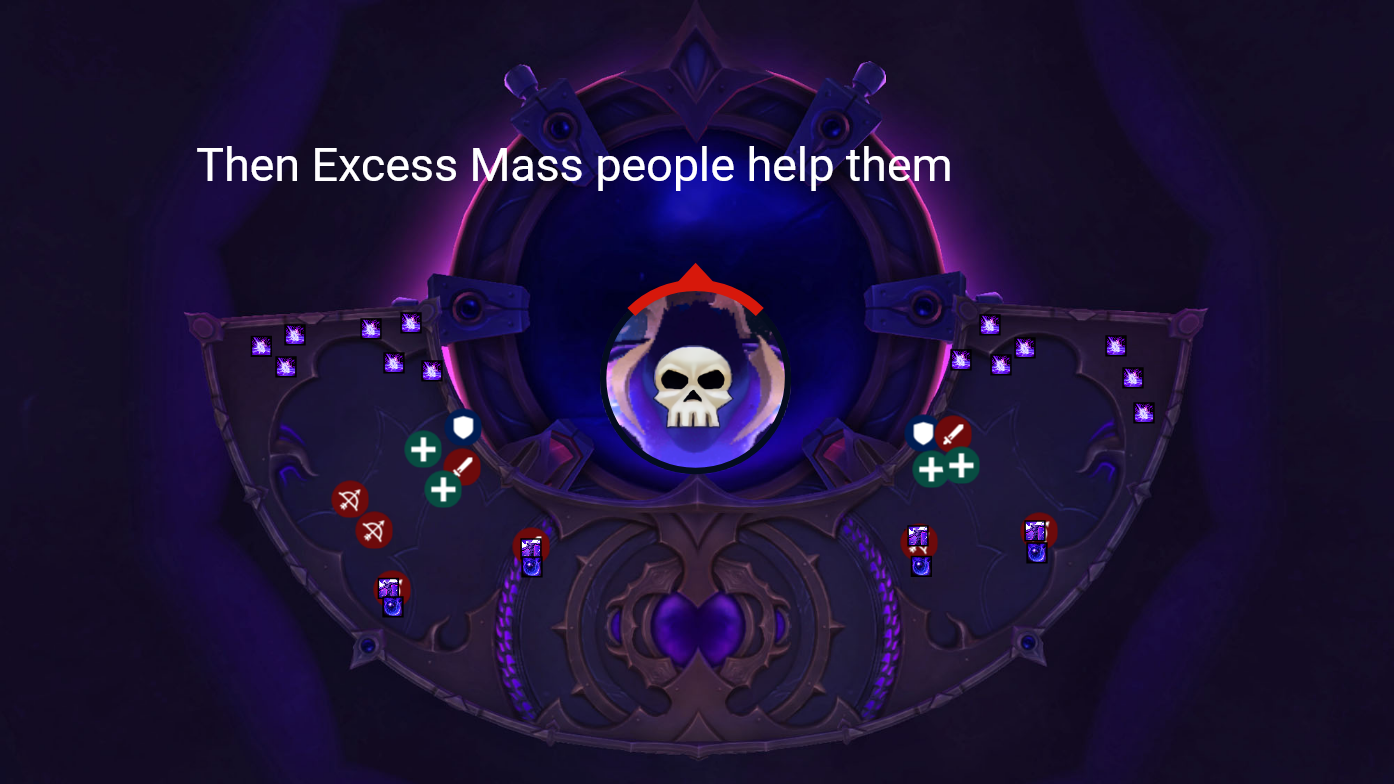
- Living Mass - This is a mob with presumed relatively little health that does nothing but spam cast Fission, dealing light damage to a random player on each cast. When defeated, this decays into Excess Mass, which players can pick up. When 2 players with Excess Mass come into contact during Devour, they project a zone of Collective Gravity.
- Collective Gravity - When 2 or more players with Excess Mass come into contact during Devour, they project this zone, which slows all players within by 30% and grants them a stack of Collective Gravity for each player holding Excess Mass.
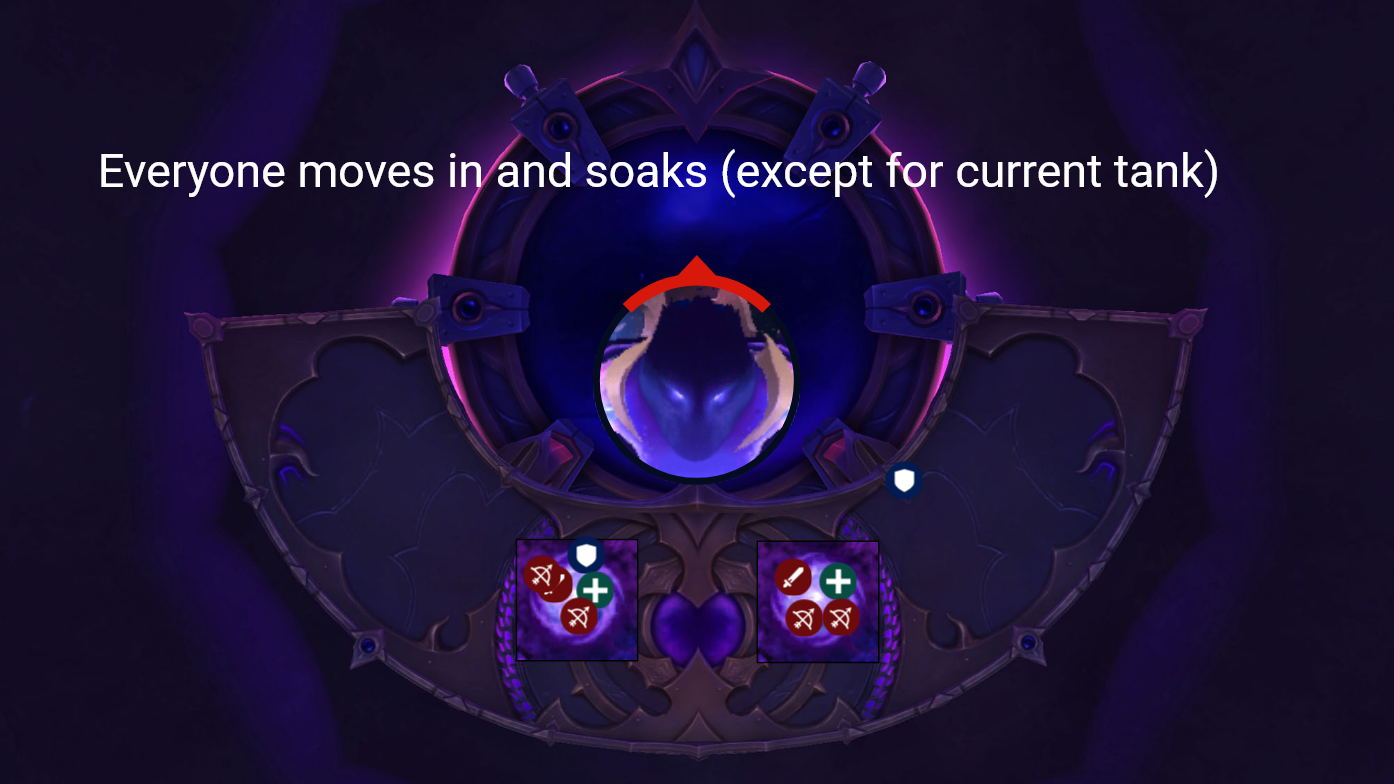
- Devour - His hunger unabated, at full energy Dimensius exerts his might to consume the raid, dealing high damage over 5 seconds and pulling in all targets towards him. When this cast finishes, it will guaranteed pull in any players who do not have Collective Gravity stacks greater than Dimensius’s stacks of Growing Hunger (I’ll elaborate on this further in the strategy section if you are confused).
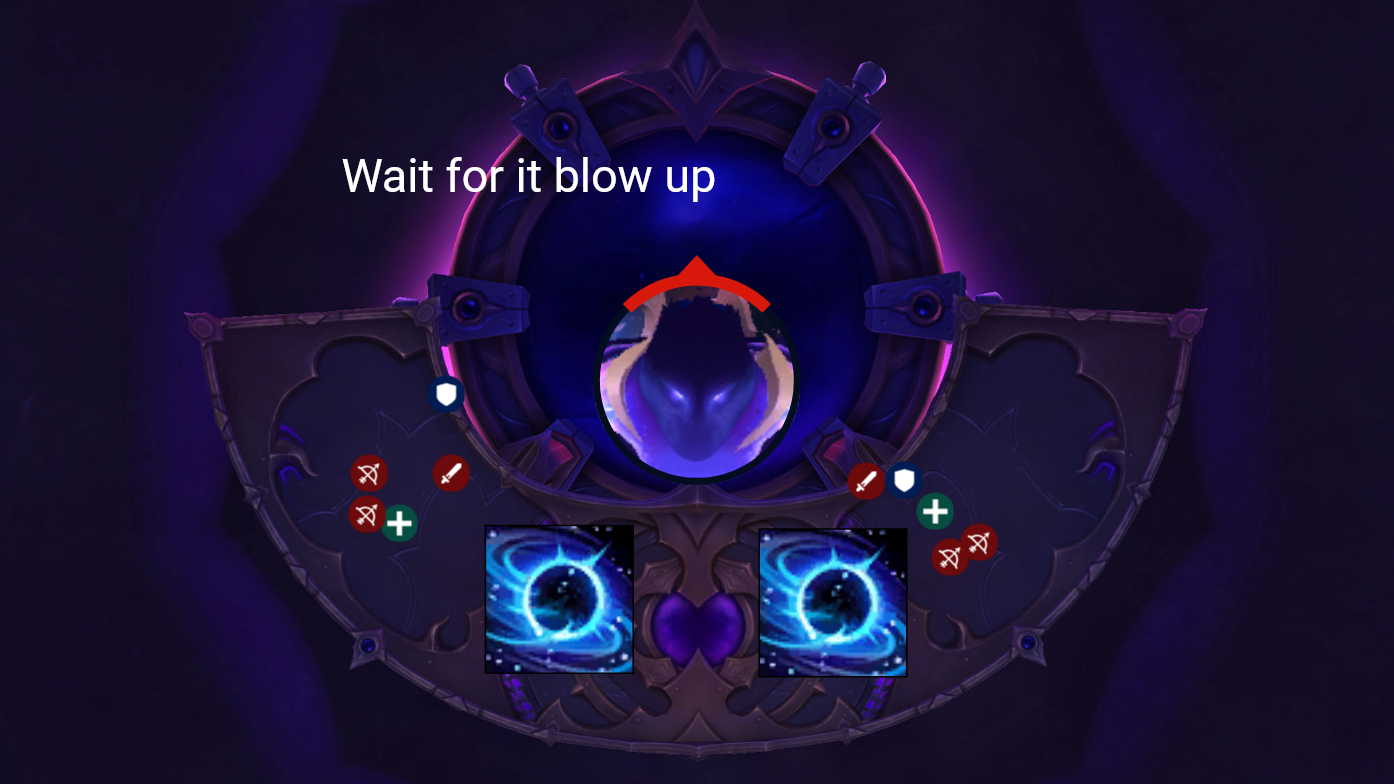
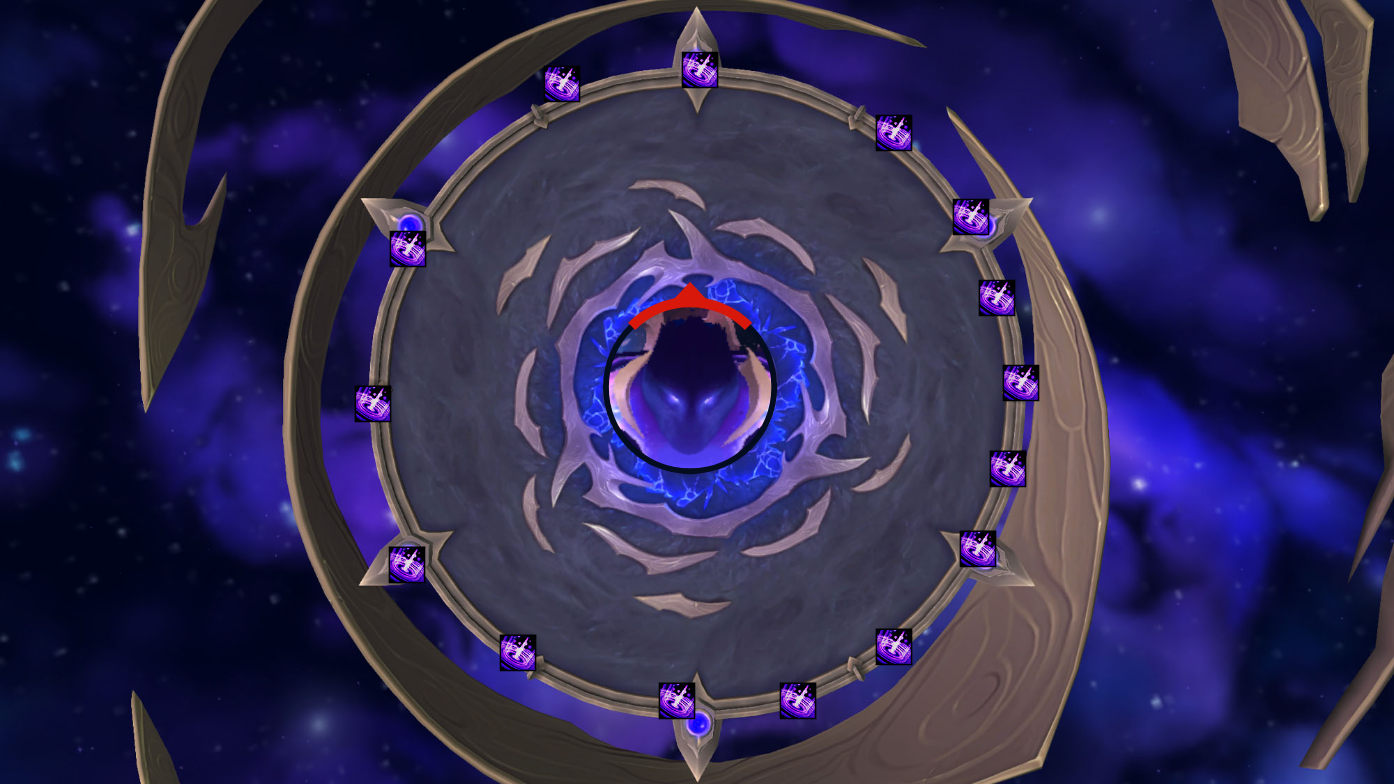
- Shattered Space - Dimensius slams his fists down onto the platform, dealing massive damage to any players caught in the effect. After the impact, a coalescence of Anti-matter forms at each location, which explodes after 10 seconds to deal lethal damage to the entire raid. Players can stand in the effect, taking light damage per second to reduce the raid-wide explosion.
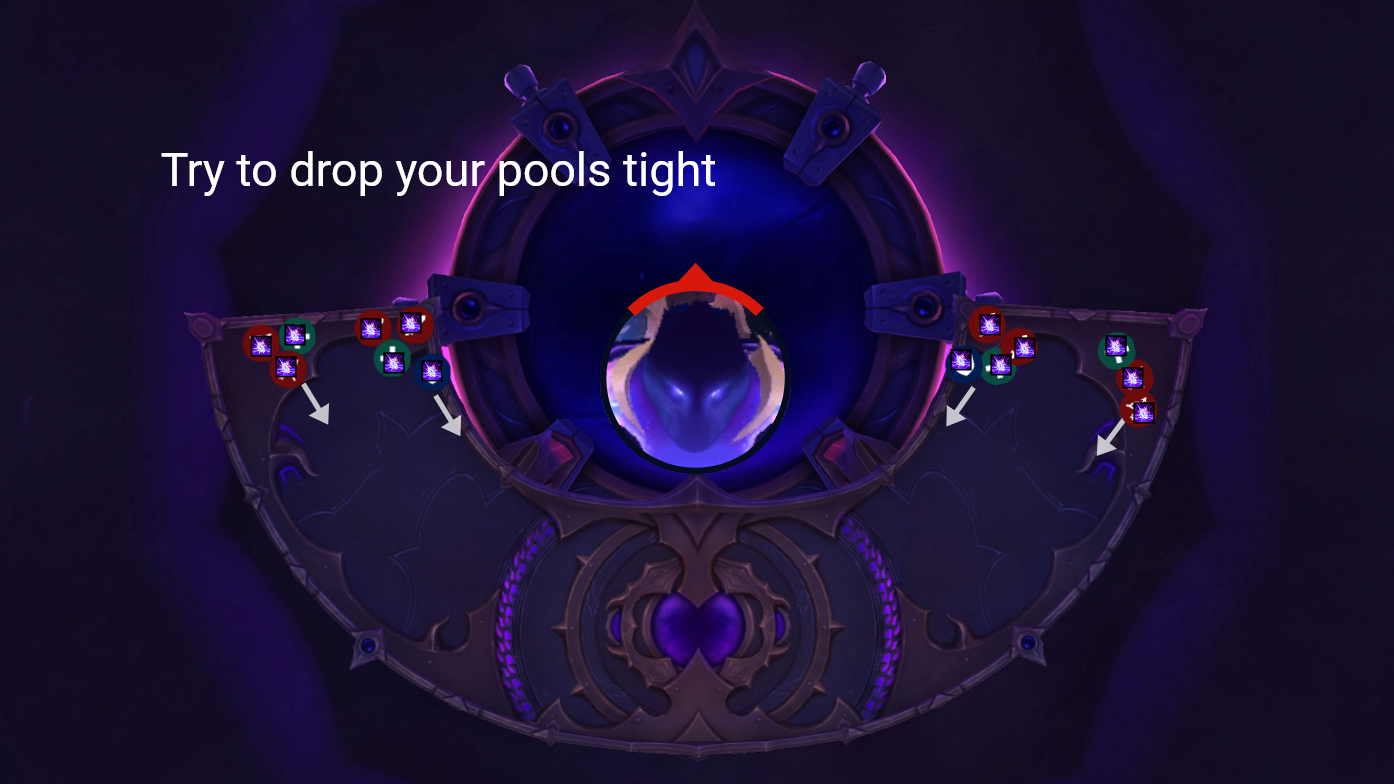
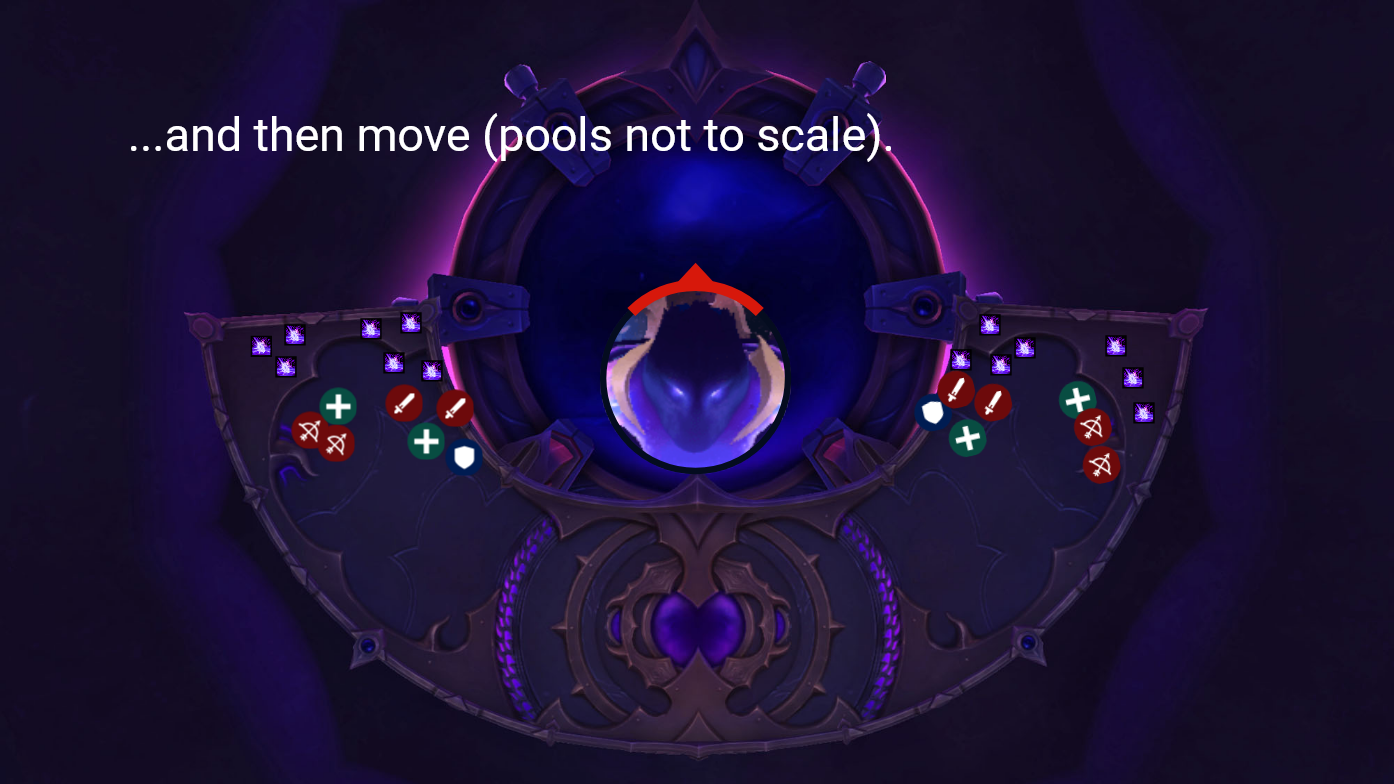
- Dark Matter - Dimensius sweeps his hand across the platform, blasting each player with dark energy in a 4 yard radius. On Heroic and higher, this leaves a pool of Dark Energy behind which deals light ticking damage but increases damage taken by 100% while in the effect. This lasts the duration of Phase One, presumably.
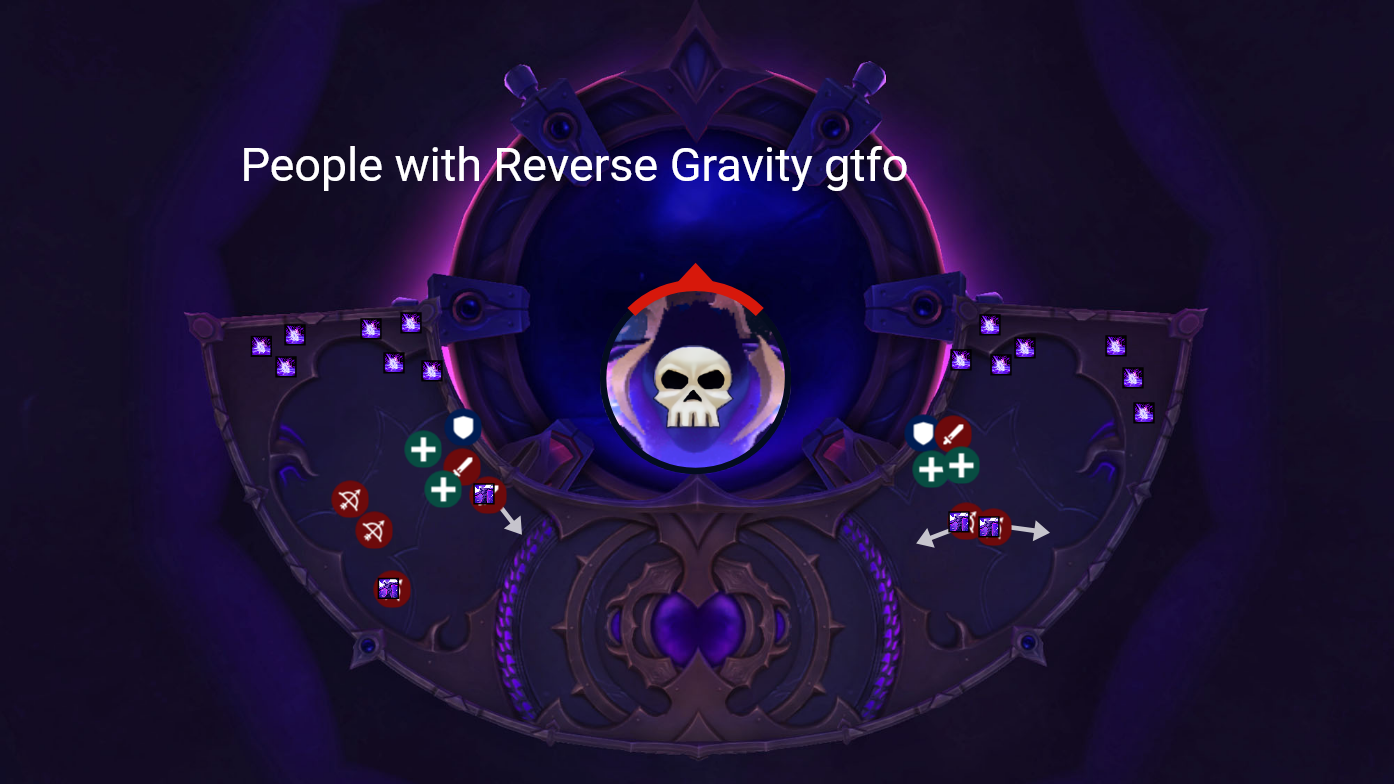
- Reverse Gravity - Dimensius picks several players, and then after 6 seconds inverts their local gravitational trajectory, sending them Airborne, causing them to begin to drift helplessly towards Dimensius This also affects anyone within the 6 yard indicated radius of that player. If two or more players with Reverse Gravity hit each other with their debuff, they fling themselves into Dimensius, instantly killing them. Players with Excess Mass can stand underneath Airborne players to provide a negating force, pulling them back down to the platform.
Intermission
After depleting Dimensius’s health the first time, he retreats and recovers into the Dark Heart. In order to both escape the cosmic horrors and pursue the Void Lord, Xal’atath empowers the players’ Reshii Wraps, protecting them from the ambient energies within the Dark Heart while also enabling them to skyride temporarily.
- Soaring Reshii - Xal’atath empowers players with this, enabling them to use flying mounts and protecting them from Endless Darkness. If you lose this buff for any reason, you fall to your death and succumb to the energy of the Void Lord
- Umbral Gate - Xal’atath creates waygates for players that grant them a burst of speed, refresh the duration of Soaring Reshii, and restore 1 Vigor to them.
- Oblivion - Dimensius devours any player who enters his body for any reason.
- Broken World - Fragments of worlds that were destroyed by Dimensius hurtle about, inflicting lethal damage to players on impact and dismounting them as well.
- Astrophysical Jet - Dimensius tears through space with immense radiation, inflicting massive damage every second to players who stray too close. Crossing the center of this streams vaporizes players instantly.
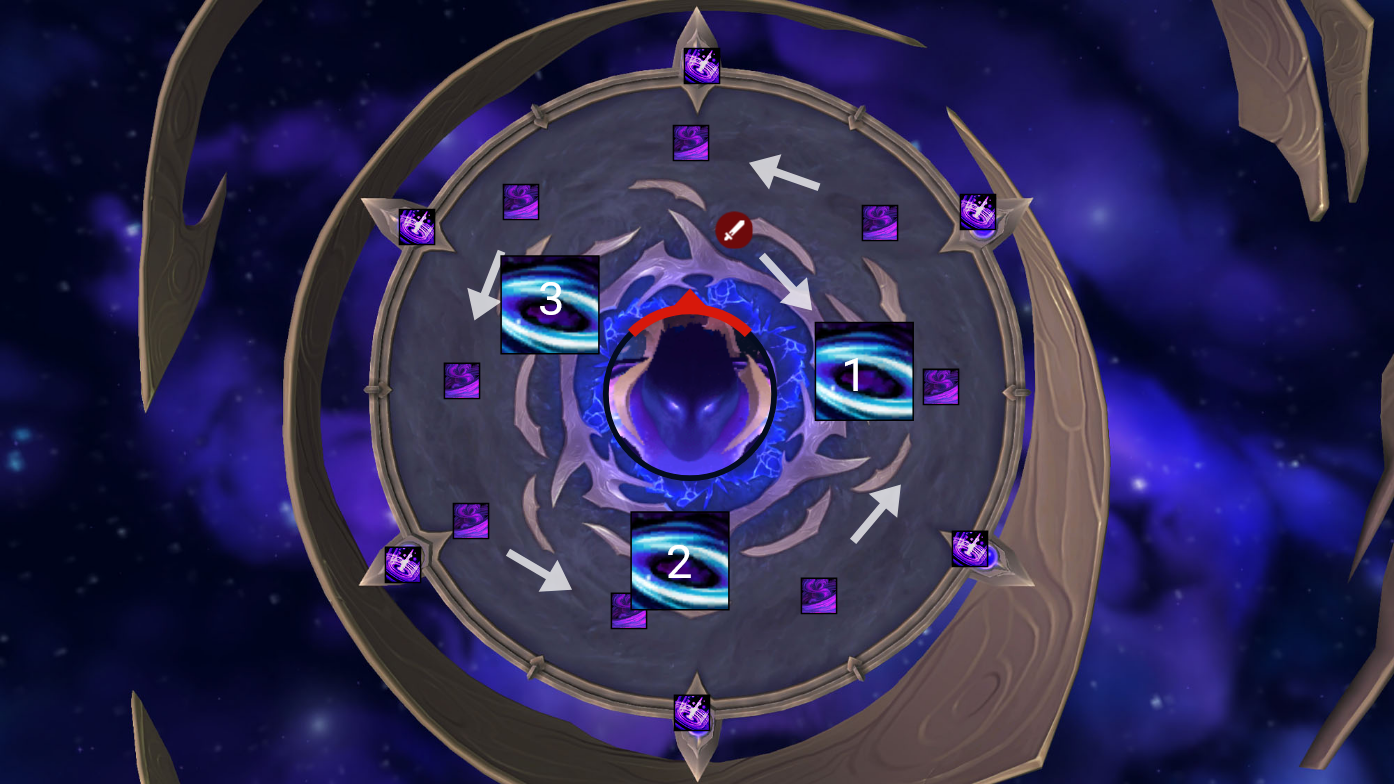
- Black Hole - Singularities formed from the immense pressure differential created by a dying star linger about, spaghettifying any player that touches it.
- Stellar Core - Concentrated stellar energy floats about that can be collected by players. This allows them to fire a Shooting Star at the nearest Voidlord upon landing, dealing 5% of its maximum health.
Phase Two
Upon making it through the obstacles within the Dark Heart, players can choose to engage with the Voidlord at the Remnant of Conquest, or the Remnant of Entropy before they can engage Dimensius himself.
- Extinction - Dimensius hurls a fragment of a once-prosperous world, inflicting lethal damage to any player struck s well as stunning them for 4 seconds if they were to survive.
- Gamma Burst - Dimensius once again tears through space with immense radiation, dealing moderate damage to all players every second as well as pushing them back over 4 seconds.
- Eclipse - Players have until either of their Voidlords complete their ritual, which seals the worldsoul fragment and renders it inaccessible, preventing them from reaching Dimensius.
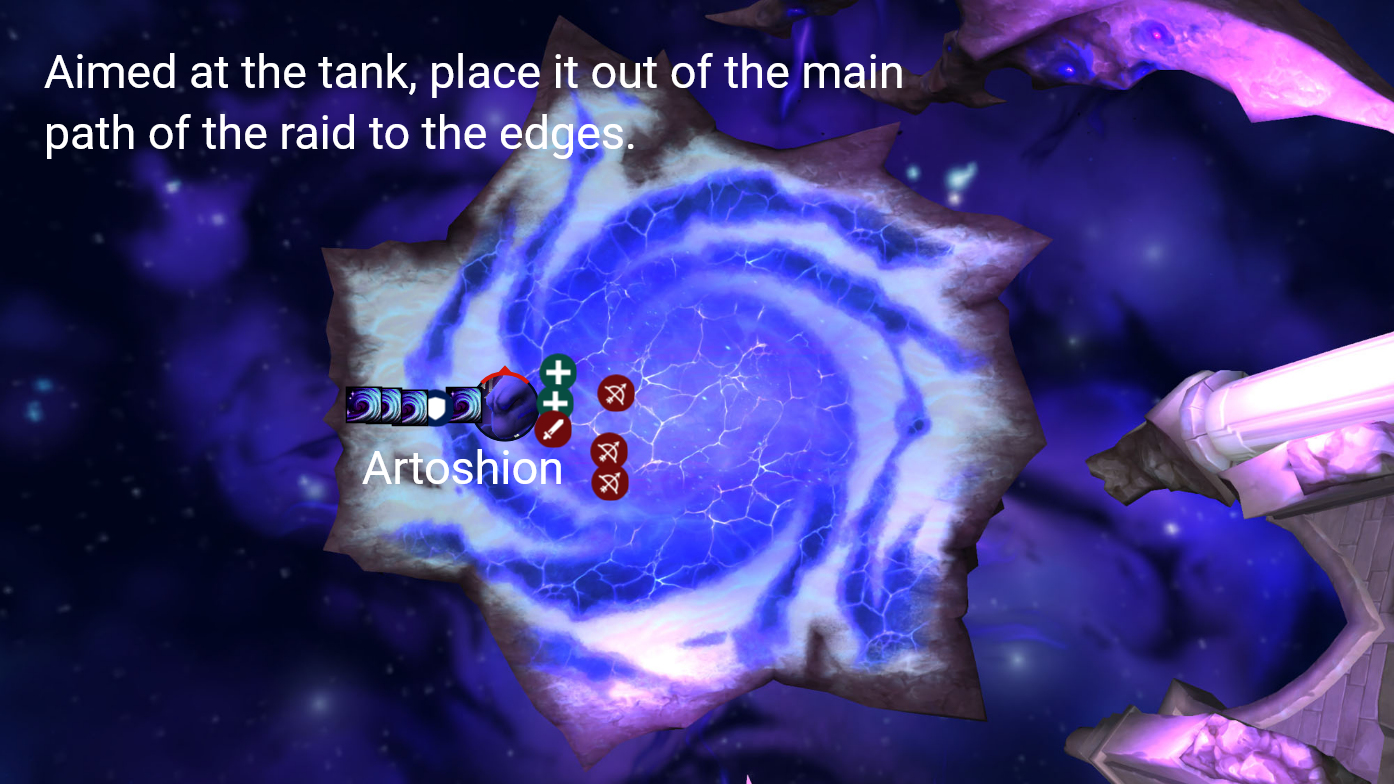
Artoshion
- Mass Ejection - Artoshion fires a line of cosmic energy, dealing high damage to any players hit as well as knocking them back. On Heroic and higher, this also leaves behind a Debris Field where it strikes, dealing light damage and slowing any players within.
- Conqueror’s Cross - The Voidlord summons a formation of Voidwardens to surround players. These march in a line across the platform, hitting anything that comes close with Voidwarding, dealing high damage to them and knocking them back. Each Voidwarden has its own health, and destroying a Voidwarden heals any others within 8 yards with Entropic Unity, restoring them to full health and causing them to take 99% reduced damage until it completes its march.
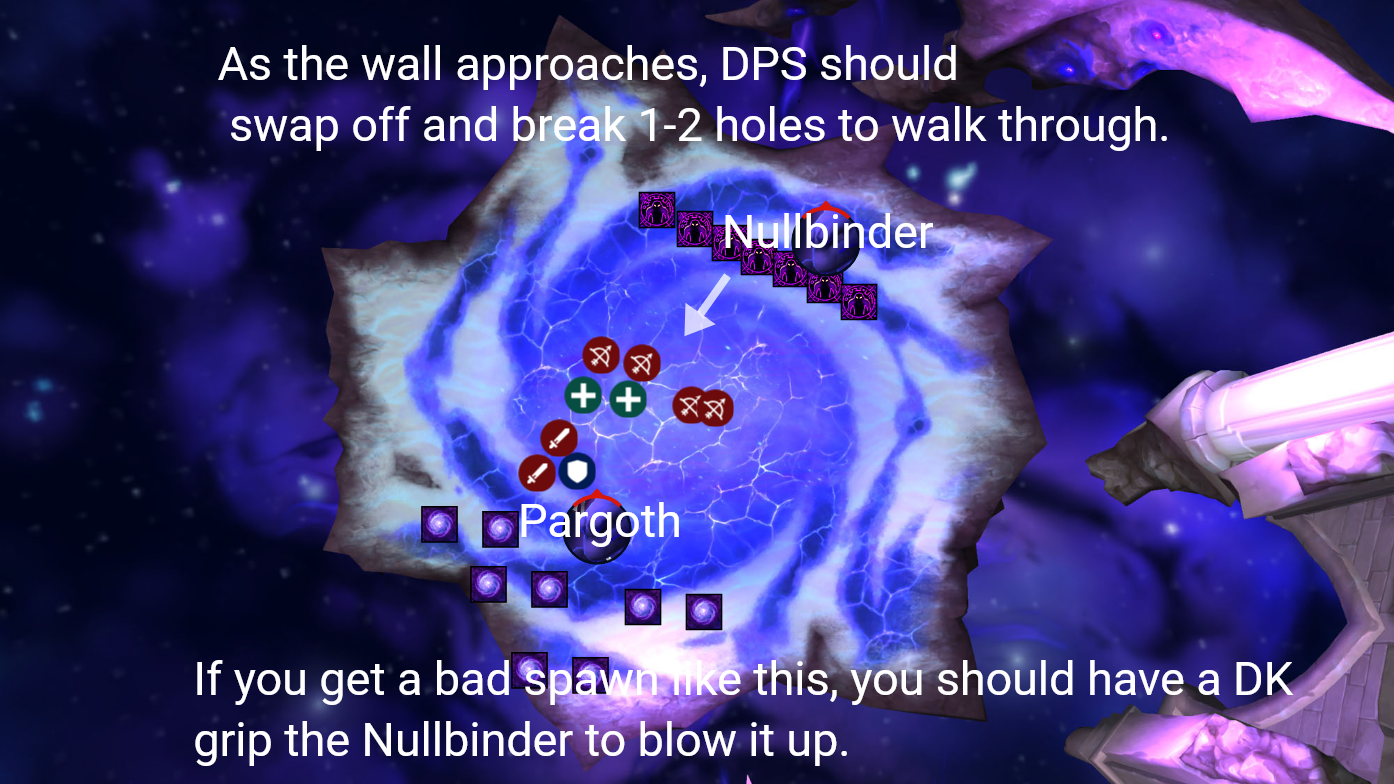
- Nullbinder - This is summoned with each Conqueror’s Cross and it simply casts Null Binding, inflicting moderate damage to all players and afflicting them with a light DoT for 20 seconds that also slows their movement speed by 30%, stacking. This can be crowd controlled, and it is assumed that you will need to use stops to prevent each casts instead of interrupts.
- Touch of Oblivion - The Voidlord’s successful melee attacks apply this to their current target, afflicting them with a light DoT that lasts 10 seconds, stacking. Reaching 15 stacks of this will instantly kill the player.
Pargoth
- Stardust Nova - Pargoth deals a burst of cosmic radiation in a 10 yard radius around himself, which does high damage. On Heroic and higher, this also leaves a Debris Field in the area it was cast.
- Pargoth also uses Conqueror’s Cross, Nullbinders, and Touch of Oblivion.
Phase Three
After players reach their respective worldsoul fragments, they combine their power with Xal’atath in a massive counter-attack that sends the All-Devouring reeling, and players pursue him into the final stage, Devourer’s Heart.
- Oblivion - As before, coming into contact with Dimensius’s main body at any point results in the player’s demise.
- Destablized - The phase begins with Dimensius still recovering from the force of the counter-attack, taking 50% increased damage during this time.
- Accretion Disk - The lost mass of the All-Devouring swirls about the edges of the room, dealing moderate damage to anyone who touches it as well as knocking them back.
- Extinguish the Stars - Dimensius calls down 8 Voidstars over 10 seconds, each one dealing moderate damage upon landing to all players as well as high damage to any player caught in the impact location.
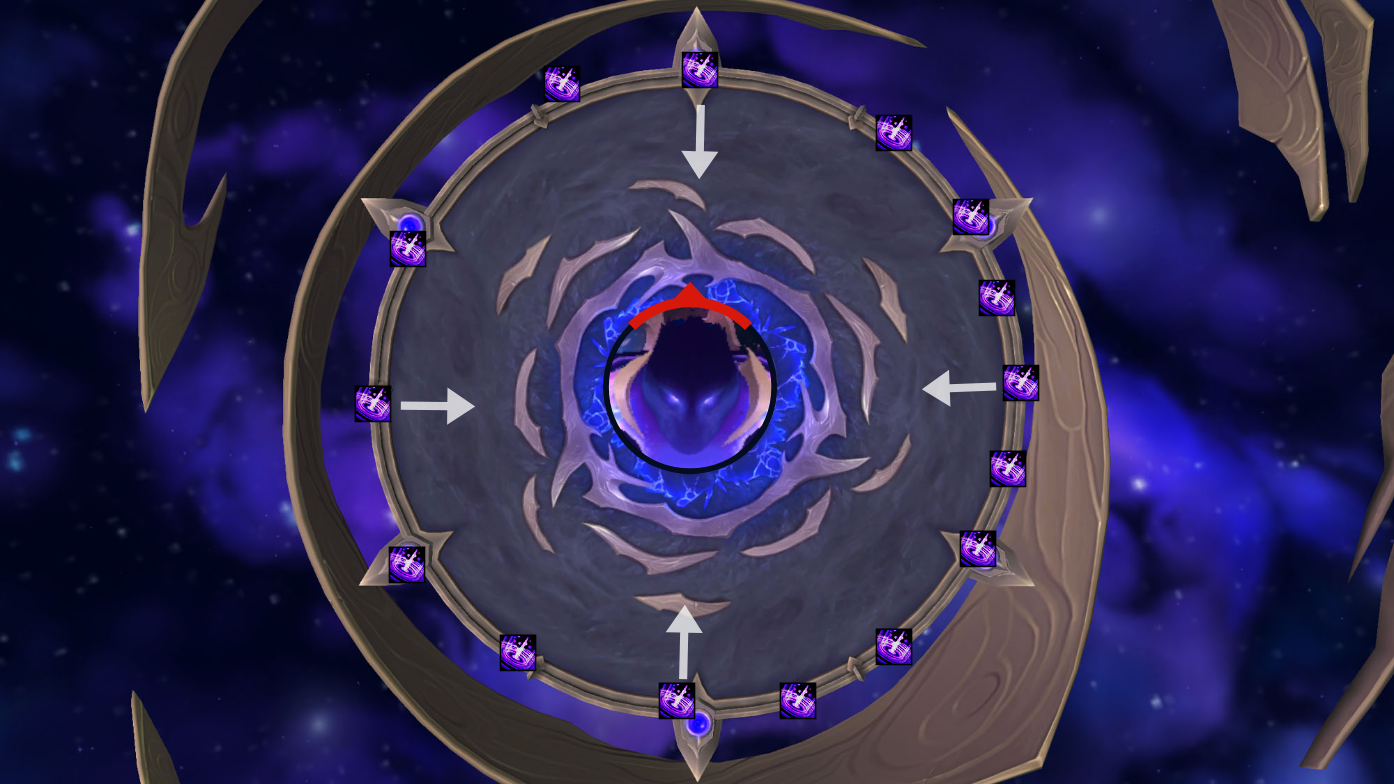
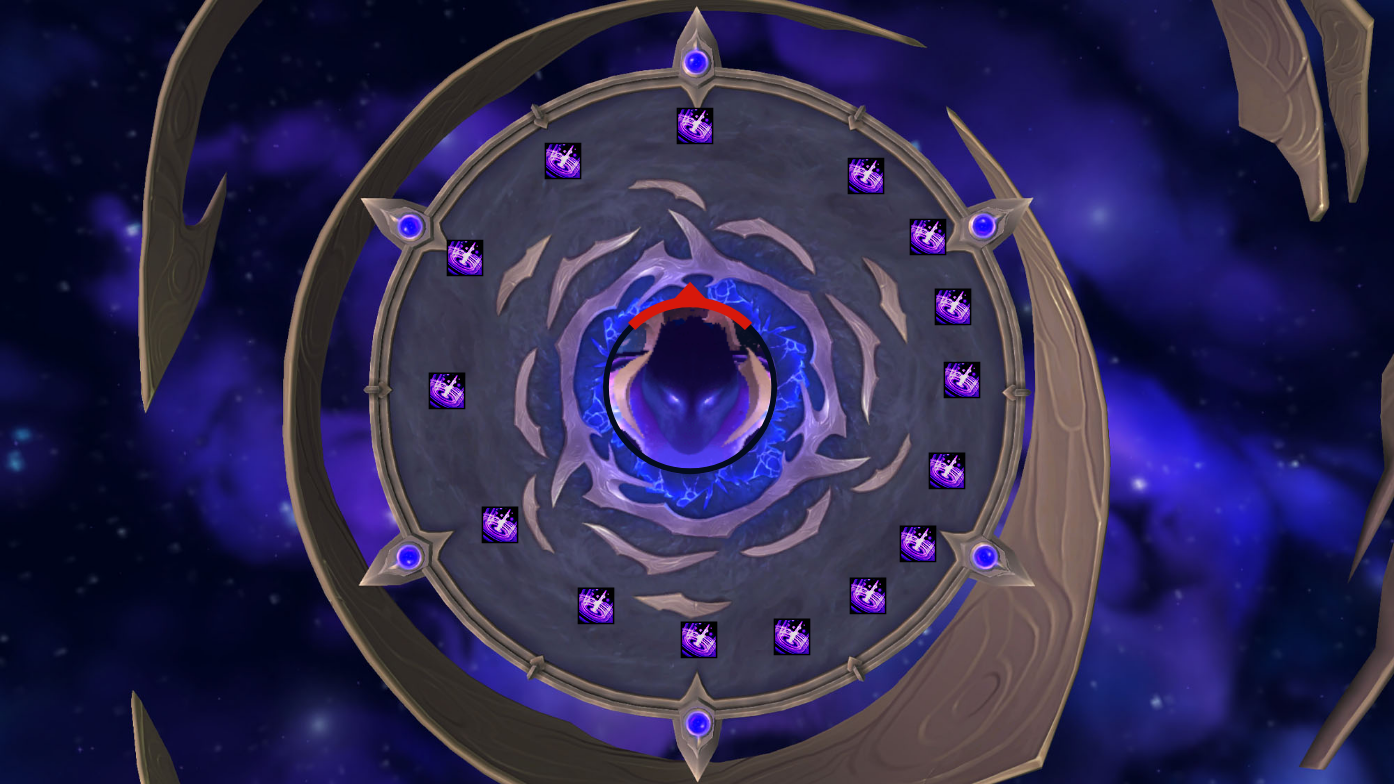
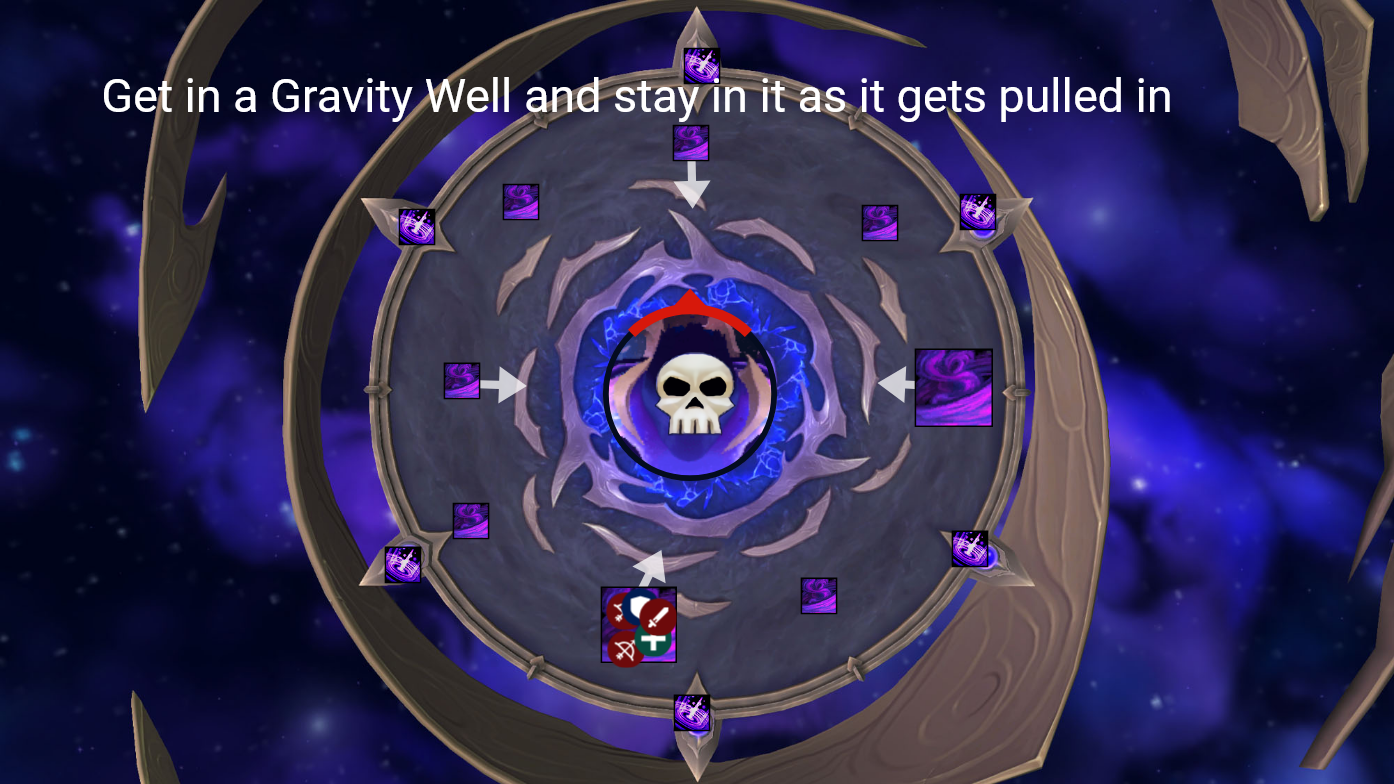
- Gravity Well - Voidstars project a gravitational well of sufficient energy to resist the might of Dimensius, but players take moderate damage every second they remain within it and have their movement slowed by 30%. Dimensius cannot Devour any player within this effect.
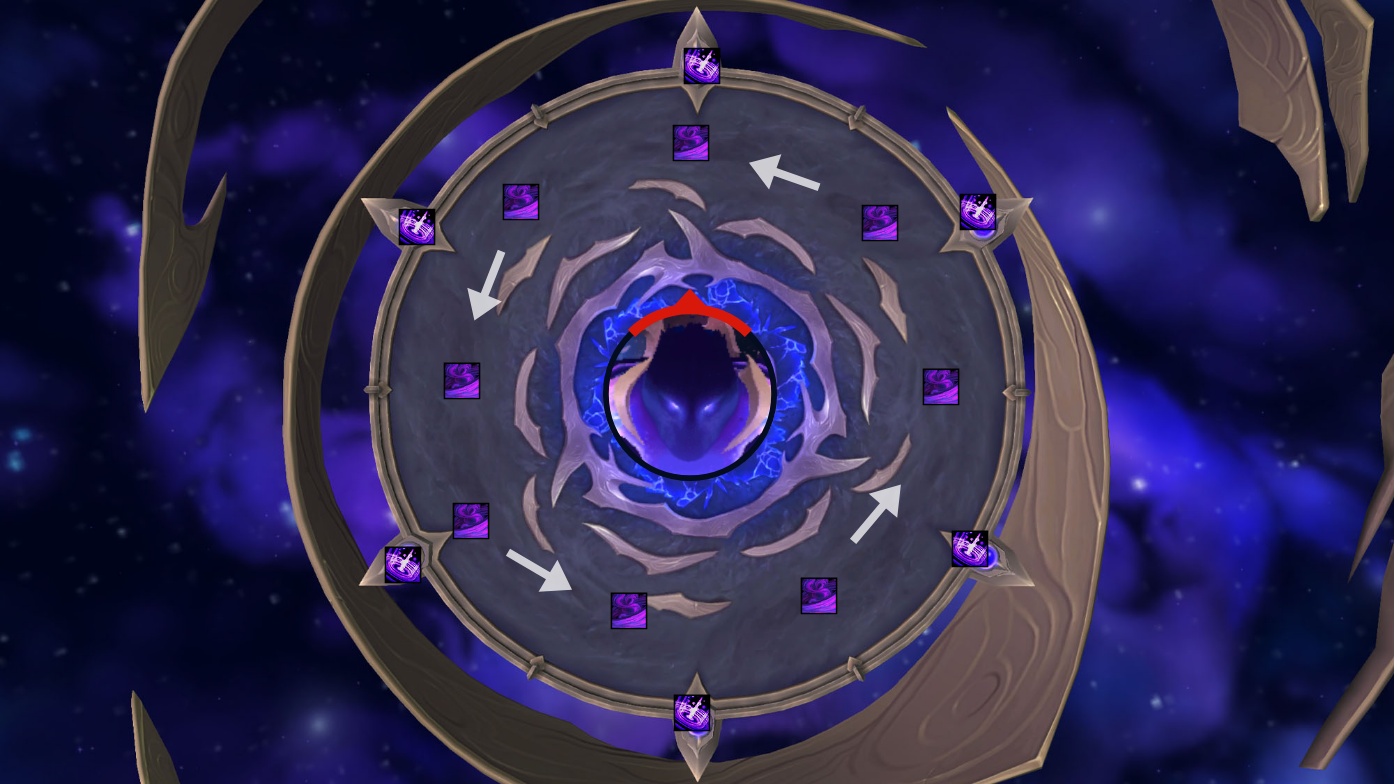
- Devour - At full energy, Dimensius once again exerts himself to pull players towards him, dealing moderate damage over 5 seconds as well as pulling Voidstars, Black Holes, and the Accretion Disk closer to the center of the room. Upon completion of the cast, any players not within a Gravity Well are pulled into the All-Devouring and immediately killed. Each cast increases the Density of Dimensius, increasing the damage dealt by Cosmic Radiation by 100%, stacking.
- Darkened Sky - Dimensius pulls down a series of celestial objects that rain down on players in sequence, dealing lethal damage to any players caught in the indicated visual as well as triggering a Shadowquake.
- Shadowquake - A shockwave of energy radiates outward from the impact, dealing moderate damage to players on contact but afflicting them with a 3 second debuff that increases damage taken from Shadowquake by 300%, stacking.
- Cosmic Collapse - Dimensius collapses space itself in order to crush his current target, dealing light damage to them but lethal damage to any non-tanks caught in the effect as well as applying Cosmic Fragility to his target and anyone hit. This increases cosmic damage taken by 150%, stacking. On Heroic and higher, this also pulls all players within 20 yards to the impact location.
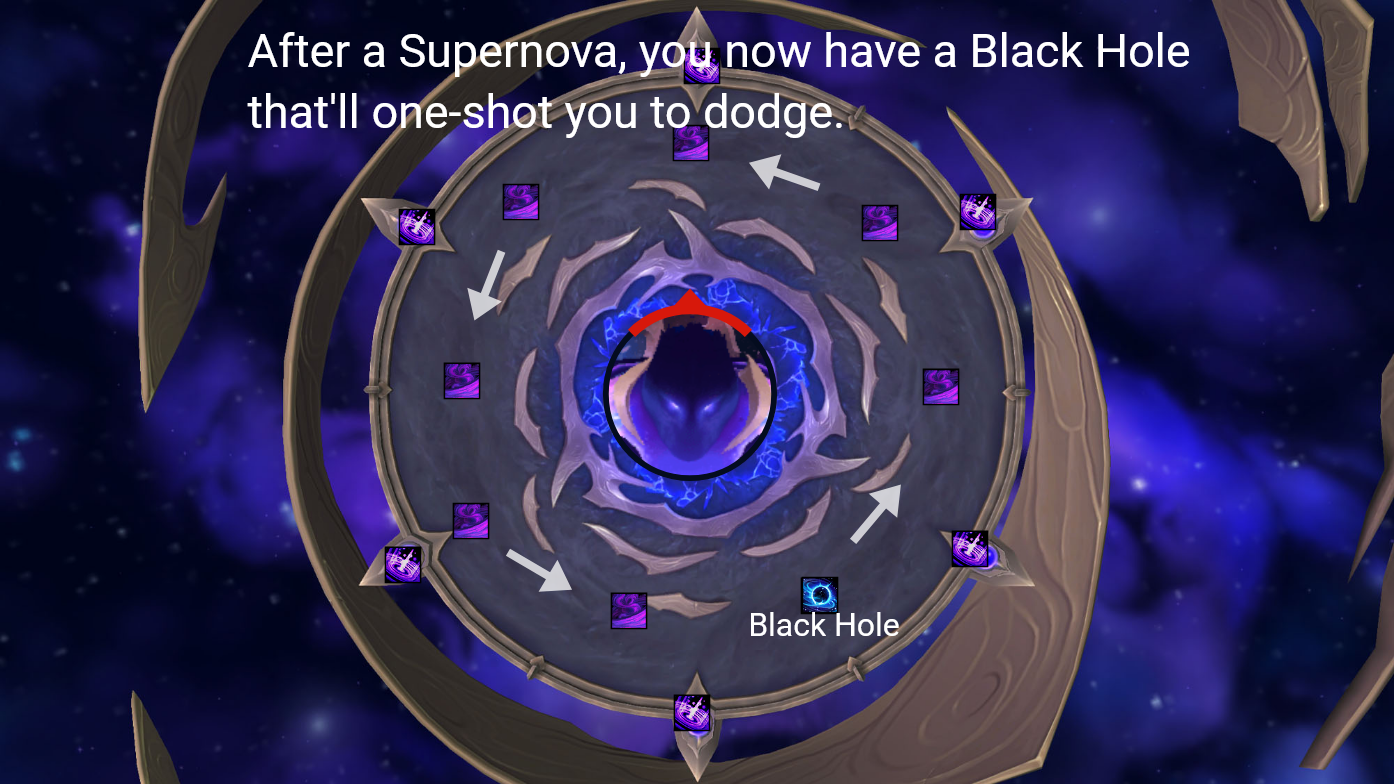
- Supernova - Dimensius drains the energy of a given Voidstar, initiating its death sequence. After 5 seconds, this causes it to explode dramatically, dealing lethal damage to all players, but reduced by distance. The aftermath of this process leaves a Black Hole in its place.
- Black Hole - A singularity that orbits Dimensius, spaghettifying any player that comes into contact with it, instantly killing them.
- Voidgrasp - Dimensius afflicts random players with this debuff, reducing their movement speed by 50% and dealing moderate damage over 8 seconds.
- Fists of the Voidlord - Dimensius’s melee attacks curve spacetime in such a way that all futures lead to him for his current target, forcing them into melee range if they are not already within it, dealing damage and knocking away any players within 15 yards when this occurs.
- Cosmic Radiation - Passive rot every 2 seconds for the remainder of the encounter.
Strategy (Normal and Heroic)
As you can see, there are quite a great deal of abilities in this encounter. For the most part, however, it is not an overly complex encounter in terms of its execution on these difficulties.
Phase One
- The raid should split into two teams, like so:
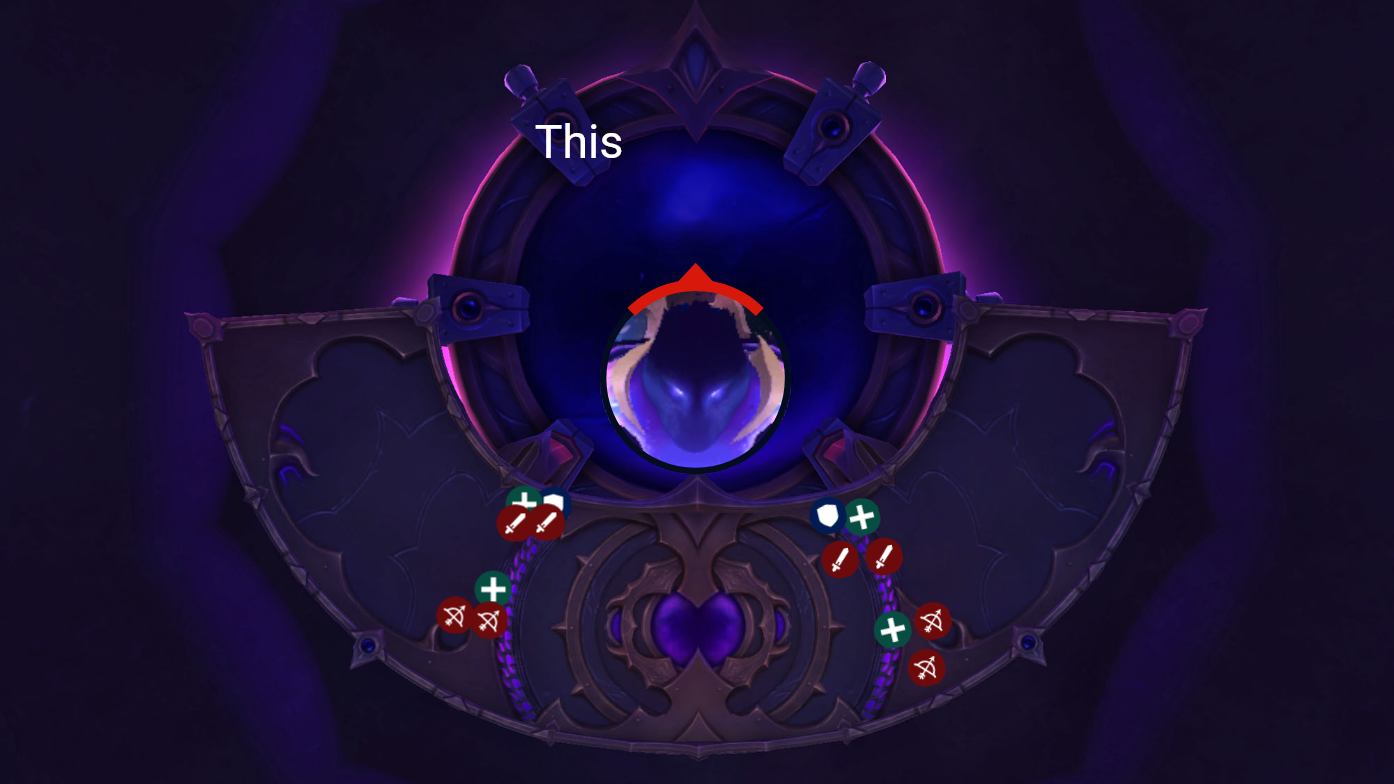
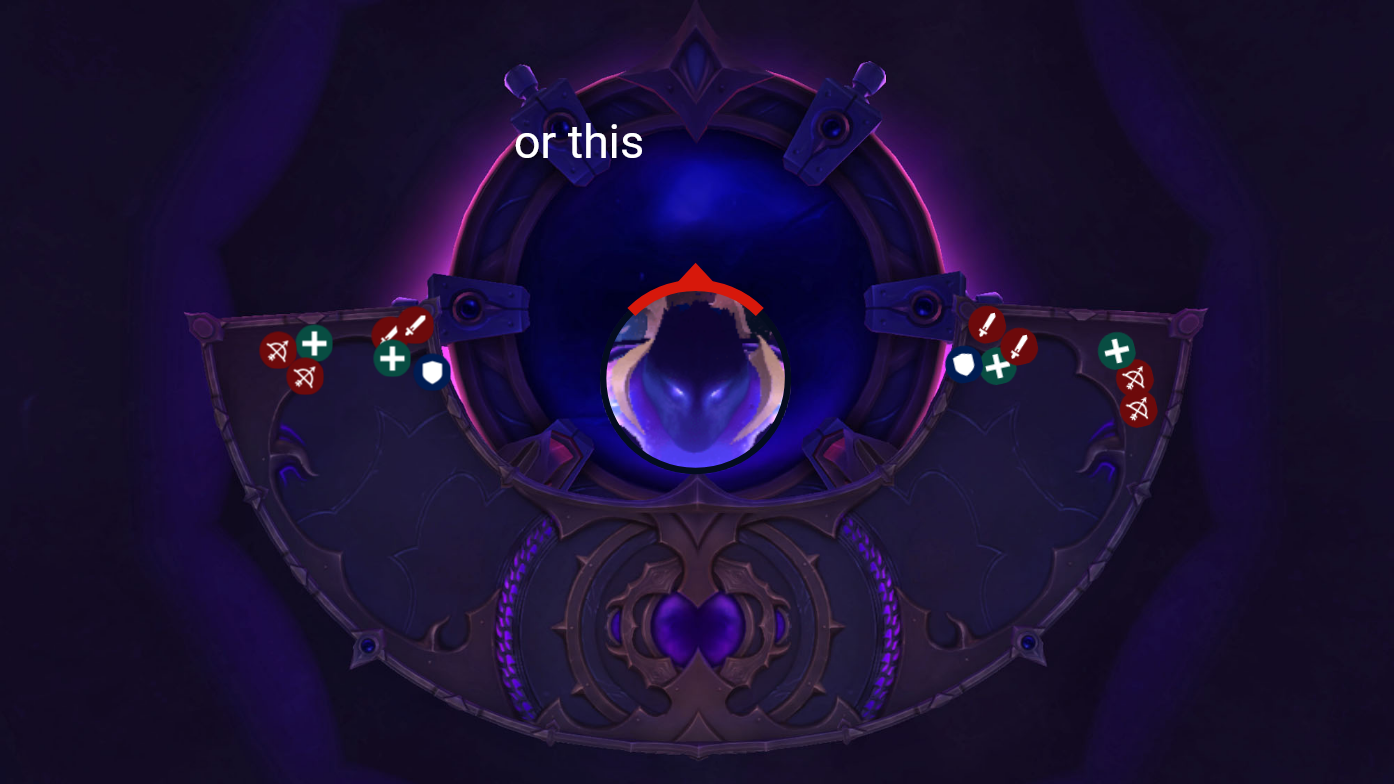
- This is both for soaking the Antimatter left behind by Shattered Space, as well as on Heroic and higher for space conservation. This should feel quite similar to the Volcoross encounter from Amirdrassil.
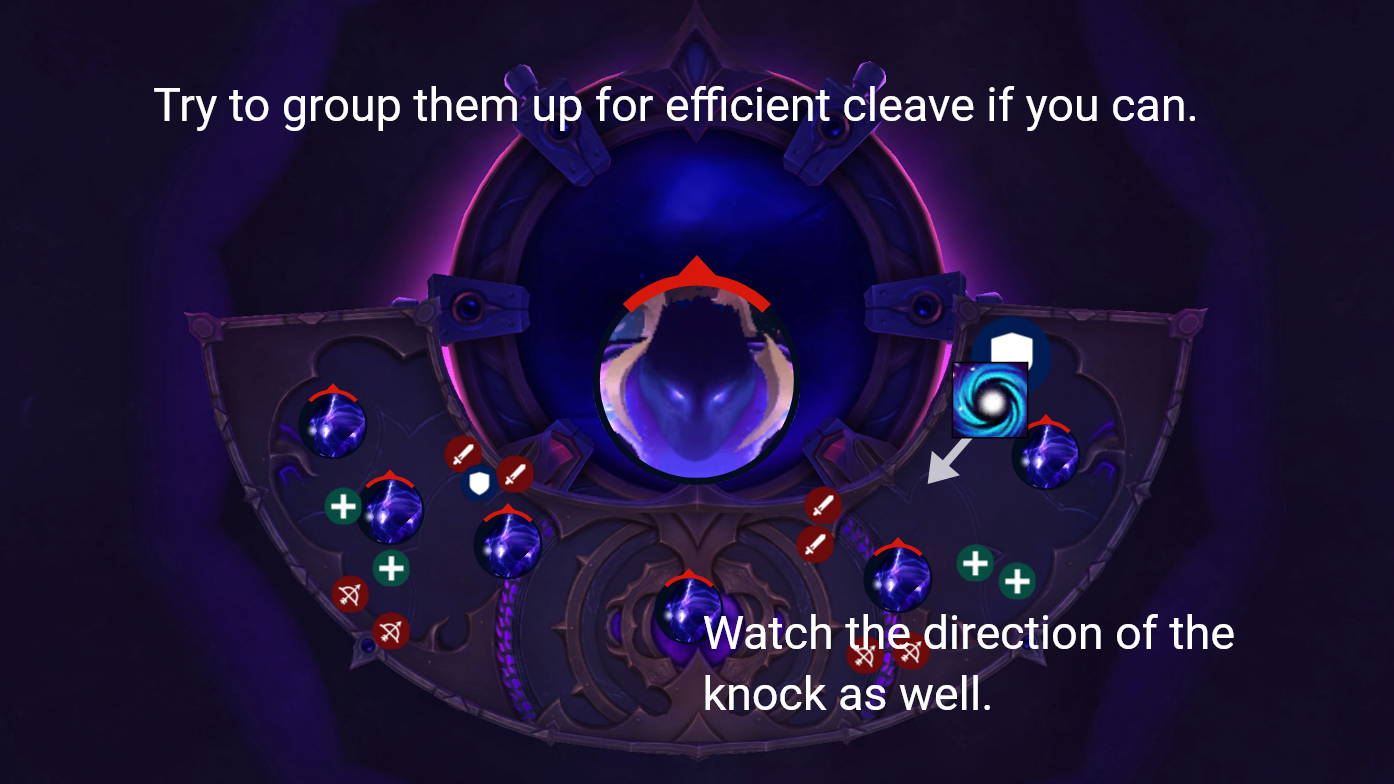
- Whenever Dimensius uses Massive Smash, players should quickly gather the Living Mass mobs together using displacement effect such as knocks or grips. The tank currently tanking cannot realistically aid in this effort, which should be considered. The tank who takes the Massive Smash should make sure to be careful about where they position, and the rest of the raid should also note their position in order to avoid getting knocked off the platform.
- After the Living Mass’ die, you’ll need players (which you should assign, ideally), to pick up the Excess Mass each Devour cycle. These players can simply play normally until Reverse Gravity, at which point they should spread out and begin pulling Airborne players back down.
- When Devour occurs, players should assemble at a pre-determined location or marker, and ping otherwise, the Excess Mass players stacking together to provide Collective Gravity. With each Devour cast, you will need 1 additional player per side to prevent the raid from being consumed by Dimensius.
- Players should loosely spread in their quadrants for each Dark Matter, and on Heroic and higher should intelligently distribute themselves for optimal space conservation.
- When Reverse Gravity occurs, make sure to spread out, as if two players with the debuff hit each other when it expires they will both die.
Intermission
- Players should do their best to avoid the various obstacles, making sure to constantly fly through the provided waygates to refresh Soaring Reshii.
- The same teams you had for Phase One can be sent to either Remnant of Conquest or Remnant of Entropy. It is likely one is on the “left” path, and one is on the “right”.
- Some players should make sure they grab the available Stellar Cores before going to their respective sides to make use of the free damage provided by them.
Phase Two
This phase is quite simple but can quickly go wrong. It should be made very clear how the raid will be moving and which Voidwardens will be killed.
- When the Conqueror’s Cross occurs, players should quickly eliminate a chosen Voidwarden and move through the gap provided. The Nullbinder should be eliminated while cleaving on to the respective mini-boss.
- It is very likely there will be some kind of overlap with Gamma Burst and the Conqueror’s Cross, resulting in players being blown into the incoming wall or potentially even being blown off the platform if the raid is positioned in such a fashion. Movement speed cooldowns and quick elimination of the chosen Voidwarden is crucial here.
- On Heroic and higher, the tanks will need to make sure they orient and move their mini-bosses as needed to preserve space. Remember that Artoshion does a line, and that Pargoth drops a pool of Debris Field.
- After their mini-boss is defeated, each side will presumably just need to wait until the other side has completed, and then it is likely some kind of cutscene or RP will occur before players are teleported to the Devourer’s Heart for the final phase.
Phase Three
The final phase is a burn to the end, with the raid damage increasing over time as the encounter space is slowly condensed to a single point, with the deadly stellar debris complicating things as the phase progresses.
- Depending on the length of the encounter, if you were able to lust on pull you’d likely want to lust here again. If you get here before 10 minutes, then you should definitely just hold lust for this moment and use all available CDs to make use of the damage amp.
- After he recovers, Dimensius will cast Extinguish the Stars and form the Accretion Disk.
- From here, the natural enrage will be the 8 Voidstars circling the arena. Once you run out of them, there is nothing to save you from the All-Devouring consuming you in one last great pull.
- For Darkened Sky, players should quickly identify the order of the Shadowquakes and walk through them in sequence before each shockwave reaches them to avoid being hit while still having the debuff from a previous Shadowquake on them. This is very similar to the main mechanic from Dausegne in Sepulcher of the First Ones, or Uu’nat from Crucible of Storms.
- When Dimensius casts Devour, players need to quickly find the nearest Voidstar and remain in its Gravity Well until the cast has finished in its totality.
- Likely after each Devour, and possibly once in between each cycle (so, twice each full ability rotation, making the enrage around 4 Devours), Dimensius will pick a random Voidstar (possibly some way to game this, as it most likely will choose the Voidstar nearest the greatest clump of players given the falloff damage associated) and cause it to erupt in a Supernova. Movement speed should be utilized here to help players quickly reach a safe distance from it. This of course will do naturally more damage as the fight progresses and players have less distance to put between themselves and the orbiting celestial bodies.
- As the fight drags on, players will need to dodge the Black Holes which will be in greater number as the Voidstars are destroyed while moving through each Shadowquake quickly, and as the space is constrained the tanks will be unable to move to a safe distance with their Cosmic Collapse, meaning that they will need to purposefully determine a location to grip the raid to that does not pull them through any of the aggressively deadly mechanics around the arena.
- While subtle, the Voidgrasp debuff can be quite deadly as it makes the players afflicted with it significantly more vulnerable to the movement intensive ability sequences, as well as making the ambient raid damage and bursts of damage from things such as Supernova more deadly, and these players should exercise judicial use of defensives and movement abilities.
Mythic Changes
The changes on mythic transform the encounter from a long battle of attrition into a logistical and mechanically complex struggle for survival, significantly complicating each phase.
Phase One
- The Living Mass’ now must all die within 8 seconds of the first one’s demise, or they heal to full.
- The pools left behind by Dark Matter, Dark Energy, now increase damage taken by 200%, up from 100%.
- Reverse Gravity now only takes 5 seconds to activate, and Dimensius now gains increasing stacks of Anomalous Force in between Devour cycles. This requires more and more players with Excess Mass to pull down a single Airborne player, corresponding to stacks of Anomalous Force.
Intermission
- Stellar Cores now fire a Shooting Star that deals 7% of a Voidlord’s health, up from 5%.
Phase Two
- Dimensius gains Gravitational Distortion, which he uses to occasionally apply either Crushing Gravity or Inverse Gravity to the raid. Crushing Gravity deals lethal damage to the player after 5 seconds as well as stunning them. Inverse Gravity deals light damage to any nearby player and knocks them away, but if this effect hits a player with Crushing Gravity, it instead removes the debuff from them.
- Artoshion now fires several lines at random players, up from the single line he did on Normal and Heroic.
- Pargoth now also launches Starshards when he casts Starshard Nova. These explode upon contact with players, leaving a Debris Field and afflicting them with a moderate DoT that lasts a minute. If they are hit by this effect again while under this debuff, it wipes the raid.
- Nullbinders now effectively wipe the raid if they can cast Null Binding even once, and they become completely immune to crowd control after 18 seconds.
- Touch of Oblivion now instantly kill the target at 10 stacks, down from 15, and the debuff lasts 14 seconds, up from 10.
Phase Three
- Destablized now increases Dimensius’s damage taken by 100%, up from 50%.
- Dimensius gains Gravitational Distortion in this phase as well, with the same rules as before.
- Voidstars are now significantly more volatile. They instantly wipe the raid if more than 6 players gather within a single one, and Dimensius will also cause any Voidstar that has players within at the end of Devour to erupt in a Supernova.
- Presumably, with the significantly increased rate of depleting Voidstars, he will now cast Extinguish the Stars more than once at undetermined times, which means there will be considerably more stellar objects to avoid.
Mythic Strategy
lol
Table of Contents
- Plexus Sentinel
- Loom’ithar
- Soulbinder Naazindhri
- Forgeweaver Araz
- Soul Hunters
- Fractillus
- Nexus-King Salhadaar
- Dimensius